The Raspberry Pi is an amazing piece of technology, and it’s the platform of choice for all kinds of projects. Something that makes it great is the integration of complex hardware that is taken care of for you. For example, if you wanted to use a USB device with an Arduino, there’d be a fair amount of tinkering required to enable both hardware and software integration. With Raspberry Pi, it’s built in because the Pi is a fully-fledged Linux computer.
If you’ve used the RetroPie operating system before, you’ll know how easy it is to integrate USB and Bluetooth gamepads as controllers. But let’s say you’ve got a robot that you want to control with a joystick, or in my case, I’m building an LED Matrix to use for retro games and I want to use the awesome 8Bitdo controllers for it. Well, it’s not quite as simple as connecting it and watching the magic happen. Fortunately, though, it’s a fairly straight forward process, and we’re going to walk through it step by step. It'll work with any Pi board with either Bluetooth or USB, but the Pi 3 and Pi Zero W make it especially easy.
Updating Pi
This tutorial will be easiest to follow along with if you’re using a fresh copy of Raspbian, but whatever you’re using, be sure to update it to the latest version by entering the following command into your terminal:
apt-get update && apt-get upgrade -y
As this tutorial will cover both USB and Bluetooth controllers, we’ll go through the process for both. I’ll be using an 8Bitdo Zero controller as the example Bluetooth device, but it should work for any generic Bluetooth device.
Connecting Devices
FOR BLUETOOTH CONTROLLERS:
The first thing we need to do is connect our Bluetooth device to the Pi. Whilst you can do this using the Bluetooth GUI found on the taskbar, I find it’s easier to work in the terminal as everything will be easier to see, and it will help to understand what’s going on.
First, let’s launch the Bluetooth control application, and make sure that it’s enabled (it may already be enabled, but just in case):
sudo bluetoothctl

power on

agent on

default-agent
This by default does a scan for available devices. Now, let’s run a scan of available devices with the gamepad turned off:
scan on
Now, turn your gamepad on, and re scan. If your Pi is still scanning, it’ll let you know and start a new scan when the previous one is finished. Now you can find the new device which should be your gamepad. Make a note of the device address which is formatted in pairs of alphanumeric digits:
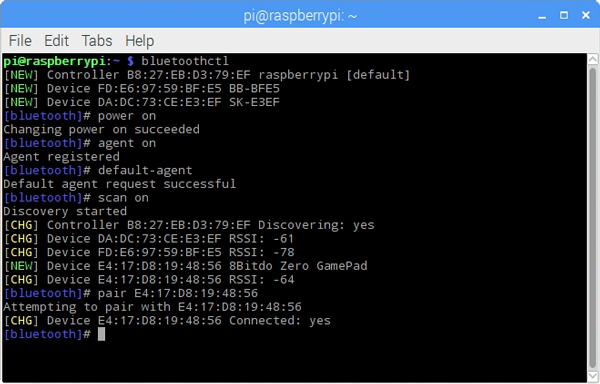
Now that you’ve got the device ID, pair with it using the following formatting:
pair XX:XX:XX:XX:XX:XX
Wait for pairing to complete, then click ‘Ok’ on the dialogue box, then close the terminal.
FOR USB CONTROLLERS:
Simply plug them into an available USB port.
Verify Controller Communication
Input devices such as gamepads, keyboards, and controllers are stored in a folder on the Pi which can be accessed to grab their input data. All we need to do is ready these folders to get access to the data.
Now that the controller is connected to the Pi, it’s time to make sure that it’s communicating with it correctly. As we did with finding the Bluetooth device, turn off or unplug your device and run the following command:
ls /dev/input
Then reconnect your controller and run it again, finding the new device, and make a note of it. Mine was called ‘event3’.
Now let’s print out all of the incoming data from the device by using the following command (replace eventX with your device code):
cat /dev/input/eventX
It should spit out a whole load of nonsense. This, surprisingly, is good! Whilst the data isn’t readable right now, it shows that it is communicating with the Pi. So now, let’s get that data into something that’s a bit more readable.
Test Communication with Evdev
To make input devices easier to use, there’s a wonderful piece of software known as Evdev which handles all of the hard work in retrieving the raw data values, processing them, and providing a set of handlers for us to use with the data. So, first we need to run a couple of commands to install the required Python and Evdev packages:
sudo apt-get install python-dev

sudo apt-get install python-pip

sudo pip install evdev
Once that’s installed, we can use a test script which comes packaged with the Evdev install to check out the functionality:
python /usr/local/lib/python2.7/dist-packages/evdev/evtest.py
Now, instead of seeing a whole bunch of garbled junk, it should give you the event codes and values, as well as time stamps for your device. You’ll need to make sure you select the correct device though. Awesome! So now we’ve got some useable data that we can read and most of the hard work is done. Next up, we’ll move to the Python IDLE and work there to make things a bit easier.
Mapping Controller
So, with event devices, there’s a bunch of data that is received, however, because the controller is taking care of low-level issues such as debouncing, we just need to know what button was triggered, and what its value was (press, release, hold etc…). This isn’t going to be a one size fits all mapping because every controller will give different data, so instead, we’ll look at how to read the data and create your own mapping.
The first script we’ll make is going to use Evdev to run in a loop and print the incoming data to the shell. We don’t need all of the data it’ll give us, we’re just looking for 3 things:
- ecode type: Depending on the type of input it could be relative (REL), absolute (ABS), or some other type
- event code: This is a unique code to determine which control has triggered an event
- event value: This tells us the value of the control so we can act accordingly
Once we have those, it’s fairly easy to set up some cascading if statements to filter for each code and value. Something to be aware of, especially with controllers that have different modes (such as 8Bitdo gamepads) is that the different modes will give different data, so make sure you stick to one! I found that using the Bluetooth keyboard mode (START + B on my 8Bitdo Zero) was the best to work with as every button was a KEY type event so it reduced the code required to filter the events.
This first script will print all of the data to the shell, so be sure to make a note of the event codes and types for each button:
#import evdev
from evdev import InputDevice, categorize, ecodes

#creates object 'gamepad' to store the data
#you can call it whatever you like
gamepad = InputDevice('/dev/input/event3')

#prints out device info at start
print(gamepad)

#evdev takes care of polling the controller in a loop
for event in gamepad.read_loop():
    print(categorize(event))
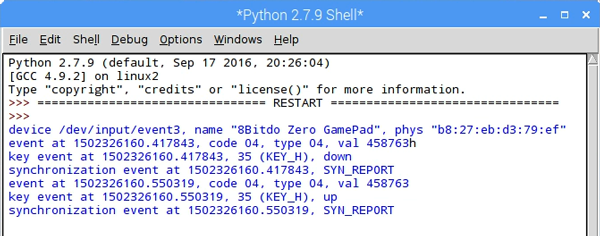
You can see in the screenshot that when we use categorize(event), it breaks it down, and each button action provides 3 lines of data. The part we’re looking for is ‘key event’ which tells us its timestamp (not really important), the event code, event type, and event value.
Once you’ve collected the event codes and types for all your buttons, you can use some basic logic to only action those input types, thus reducing the printed data. Whilst categorize(event) made it a little easier to read the data earlier, we want to just print the event data so we can see the numeric value for each control event (if your controller used types other than ‘KEY’, you’d need to change your filter accordingly):
#import evdev
from evdev import InputDevice, categorize, ecodes

#creates object 'gamepad' to store the data
#you can call it whatever you like
gamepad = InputDevice('/dev/input/event3')

#prints out device info at start
print(gamepad)

#evdev takes care of polling the controller in a loop
for event in gamepad.read_loop():
    #filters by event type
    if event.type == ecodes.EV_KEY:
        print(event)

So, you can see that the Zero gamepad is going to be nice and simple to map, because all of the buttons are just digital (binary) values, without analog joysticks. So here is a simple script I used to create labels for each control. Note that because the controller is still behaving as a Bluetooth keyboard, it can still enter characters, but if you were using this for a game, or robot, you could simply ignore those, or use another controller mode.
So here’s a simple script which filters and maps each button event:
#import evdev
from evdev import InputDevice, categorize, ecodes

#creates object 'gamepad' to store the data
#you can call it whatever you like
gamepad = InputDevice('/dev/input/event3')

#button code variables (change to suit your device)
aBtn = 34
bBtn = 36
xBtn = 35
yBtn = 23

up = 46
down = 32
left = 18
right = 33

start = 24
select = 49

lTrig = 37
rTrig = 50

#prints out device info at start
print(gamepad)

#loop and filter by event code and print the mapped label
for event in gamepad.read_loop():
    if event.type == ecodes.EV_KEY:
        if event.value == 1:
            if event.code == yBtn:
                print("Y")
            elif event.code == bBtn:
                print("B")
            elif event.code == aBtn:
                print("A")
            elif event.code == xBtn:
                print("X")

            elif event.code == up:
                print("up")
            elif event.code == down:
                print("down")
            elif event.code == left:
                print("left")
            elif event.code == right:
                print("right")

            elif event.code == start:
                print("start")
            elif event.code == select:
                print("select")

            elif event.code == lTrig:
                print("left bumper")
            elif event.code == rTrig:
                print("right bumper")

And that’s all you have to it, you can now use Bluetooth or USB gamepads in your projects wherever you have access to the terminal and Python.

