The Raspberry Pi Microscope was put together to help with soldering PCBs that have small surface mount components. Its main function is to verify the quality of solder joints and ensure there aren’t any short circuits. With the addition of an external display, the Microscope can be used as a complete electronics and software development powerhouse, supporting applications such as VSCode, PlatformIO, and KiCAD. Moreover, leveraging the Raspberry Pi platform opens up vast learning opportunities and allows for limitless customization. For example, the microscope can be configured to stream video or even serve as a fully functional Linux desktop!
The Microscope utilises the camera bus of the Raspberry Pi to connect to a high-quality camera sensor to capture the crispy microscopic images. It also utilises one of the HDMI ports and one USB port to power and communicate with the touchscreen display. The microscope stand and lens kit from Core Electronics, along with a few 3D-printed mounts and enclosures, were used to put the pieces together into one cohesive product.
To complete this project, access to a 3D printer or 3D printing service will be essential to fabricating the microscope housing. You will need a screwdriver and a soldering iron to assemble the housing. You will also need a Micro SD card port/adapter to be able to write the Raspberry Pi operating system to the Micro SD card.
In addition to the tools required, the complete bill of materials for this project are as follows:
- Raspberry Pi 4B
- Raspberry Pi 4 Power Supply
- Micro SD Card
- Raspberry Pi High Quality (HQ) Camera
- 200mm Flexible Camera Ribbon Cable
- Waveshare 5.5inch Capacitive Touch AMOLED Display
- Microscope Stand & Lens Kit
- 3x 11mm M2.5 Standoffs
- 7x M2.5 6mm screws (included with display)
- M2.5/M3 Heat-Set Insert with Matching Screw
- 3D Printed Parts (Download Files Here)

We’ll start the build by printing the CAD files for the housing. Feel free to use any material and slicer settings you prefer. I used PLA-CF from Bambu Lab with the following slicer settings:
- Layer height - 0.16mm
- Initial layer height - 0.2mm
- Infill density - 15%
- Infill pattern - Grid
- Hotend temperature - 230℃
- Bed temperature - 65℃
- Supports - enabled
- Support type - normal
- Initial layer speed - 50mm/s
- Wall speed - 200mm/s
- Infill speed - 330mm/s


While that’s printing, we can flash the operating system to the micro SD card. The software I use for this process is Raspberry Pi Imager which can be downloaded directly from the Raspberry Pi website. To flash the OS, open the Raspberry Pi Imager, select the “Raspberry Pi OS 64-bit” from the provided list and select the target storage which should be the micro SD card as shown in the screenshot below. Hit “write” to flash the micro SD card with the operating system.

Now that we have the OS ready to go, we can insert the micro SD card into the Raspberry Pi and assemble the display unit. First, screw on the small standoffs included with the Waveshare AMOLED display in the centre four standoff mounting points. Place the Raspberry Pi on top of the standoffs with the mounting holes aligned. Check that the HDMI and USB ports on the Raspberry Pi are on the same side as the respective ports on the display. Use three of the 11mm M2.5 standoffs to secure the Raspberry Pi to the display, keeping the hole closest to the ethernet port free. Secure this point with an M2.5 screw. Finally, plug in the HDMI and USB connectors to complete the unit.


Once the 3D-printed parts are ready to go, we can assemble the housing for the Microscope Pi. A heat-set insert needs to be pressed into the back of the display shroud. Place the insert in the hole. Using a soldering iron, melt the insert into the plastic until it’s flush with the top layer. The display shroud can now be fitted around the main unit and screwed into the outer four standoff mounts on the display with the Waveshare provided screws.


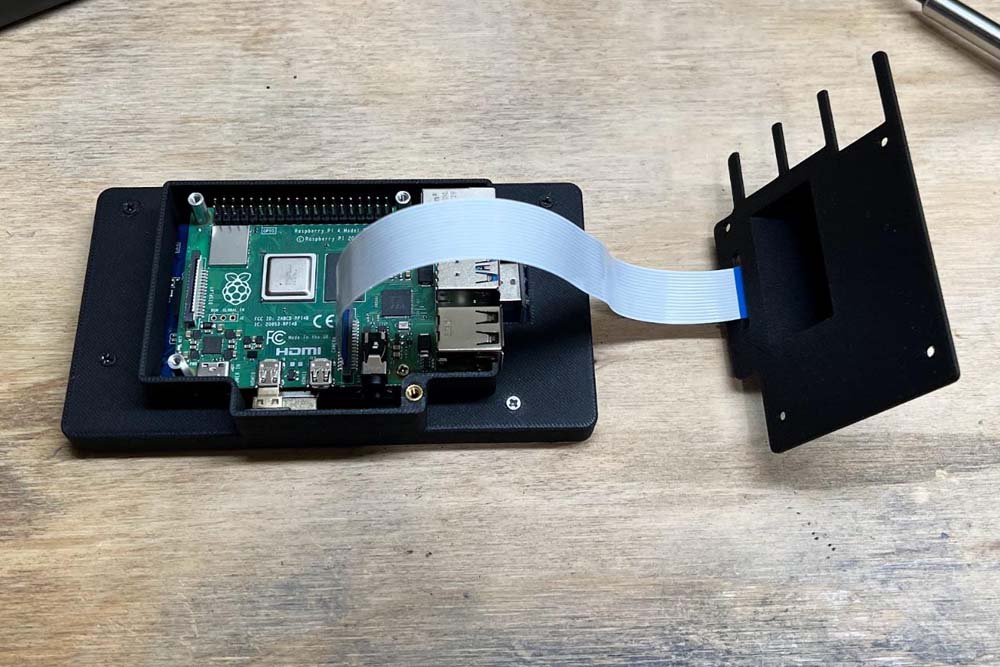
To mount the Raspberry Pi High Quality (HQ) Camera, we first need to remove the tripod mount from the assembly. This is easily achieved by removing the two hex screws that hold it in place. Insert the flexible camera ribbon cable into the CSI port on the back of the camera assembly by unlatching the black tab and sliding the cable in. Make sure the ribbon stiffener is visible on the backside of the camera assembly before locking the latch. To mount the camera onto the printed camera mount, feed the ribbon cable through the cable slot and line up the screw holes on the PCB with the printed standoffs. Use four screws to secure the camera in place.


To complete the build, we have to assemble the display unit and the camera mount together. Attach the camera ribbon cable to the Raspberry Pi. With a little clever folding, close the camera mount over the back of the display unit. Line up the screw holes with the standoffs and secure the camera mount in place. The microscope lens can now be screwed onto the camera mount. In its current form, the Microscope Pi can be used as a handheld microscope. Slide the lens into the microscope stand and tighten the thumb screw to complete the build as a desktop microscope!
Plug in the USB-C power supply and Raspberry Pi OS should boot right up! But we’re just at the desktop and we want to see some microscope goodness. Start by connecting a USB keyboard to the Raspberry Pi and opening the terminal. To open the camera, run the command: ``libcamera-hello -t 0 –fullscreen``. If everything is set up correctly, the camera should open right up!
To automate this process and save from having to enter a command every time we turn the Raspberry Pi on, we can update the ``~/.config/wayfire.ini`` file to tell the Wayfire compositor to open the camera at boot. First, open the file in a text editor and add the following extra lines to the end.
``sudo nano ~/.config/wayfire.ini``

```

[autostart]

libcamera = libcamera-hello -t 0 –fullscreen

```
Now if you reboot your Raspberry Pi, the camera should automatically open! Check out some of the example images captured by the microscope below!