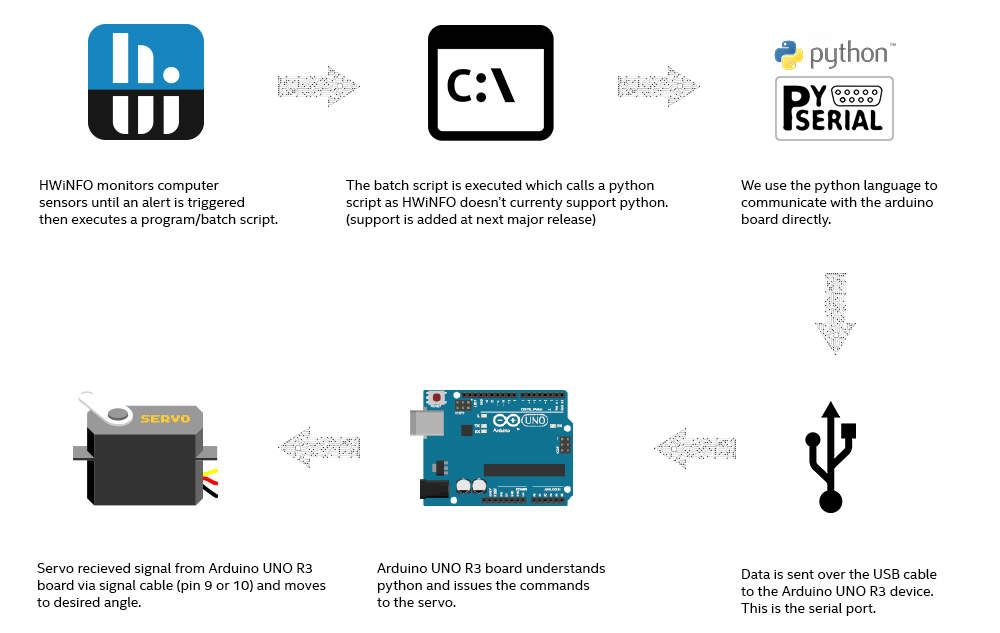
Introduction
So now everything is available in this day and age, and all those childhood dreams can now come true as parts, technology and software has come a long way.
I had recently taken up the hobby, RC planes. Eventually I learnt how to solder and wire basic circuits etc, so I decided to build a desktop and the hunt for a case was on. Something unique with plenty of room and great cosmetics. The Inwin 915 stood out.
After building the computer, something didn’t feel right. The panels would swing freely on hinges, it was like a big chunk of metal flapping in the air. So how would it be, if they opened when things started to get hot inside ? and close when things cool down, automatically! NOW THAT'S COOL!
The hardware side of things was straight forward, but the programming was my block. No experience programming at all. Through much reading I finally committed that it was possible through Arduino.

Software
- Arduino IDE (Used to upload sketches to an Arduino UNO R3 board)
- Python 3.10 + Pyserial (Language used to communicate to Arduino directly from the computer)
- HWiNFO (Comprehensive Hardware Analysis, Monitoring and Reporting for Windows and DOS)
Hardware
Screw Shield Terminal Expansion Board for Arduino Uno Board
StarTech USB A to USB 4 Pin Header Cable
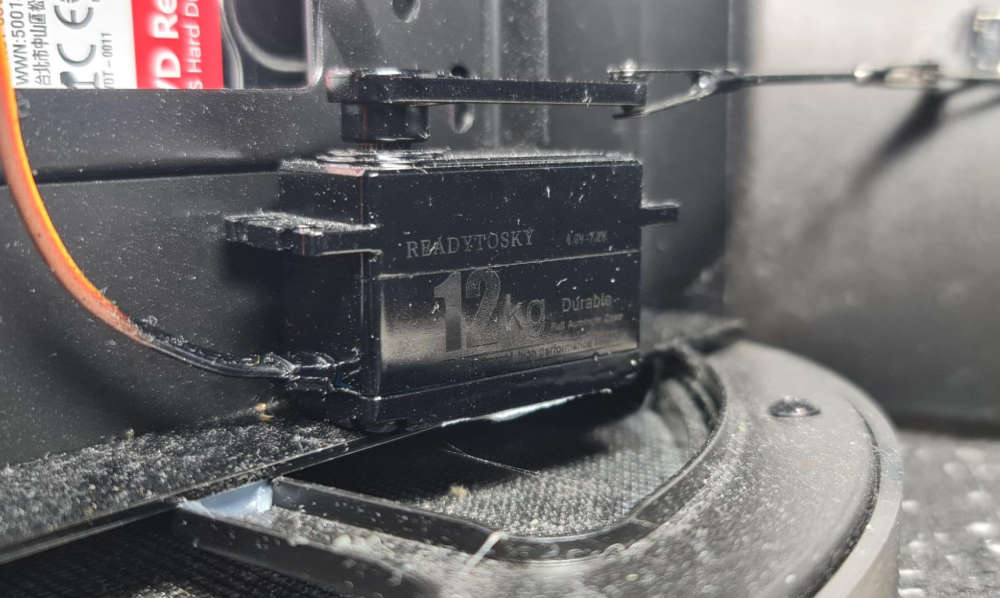
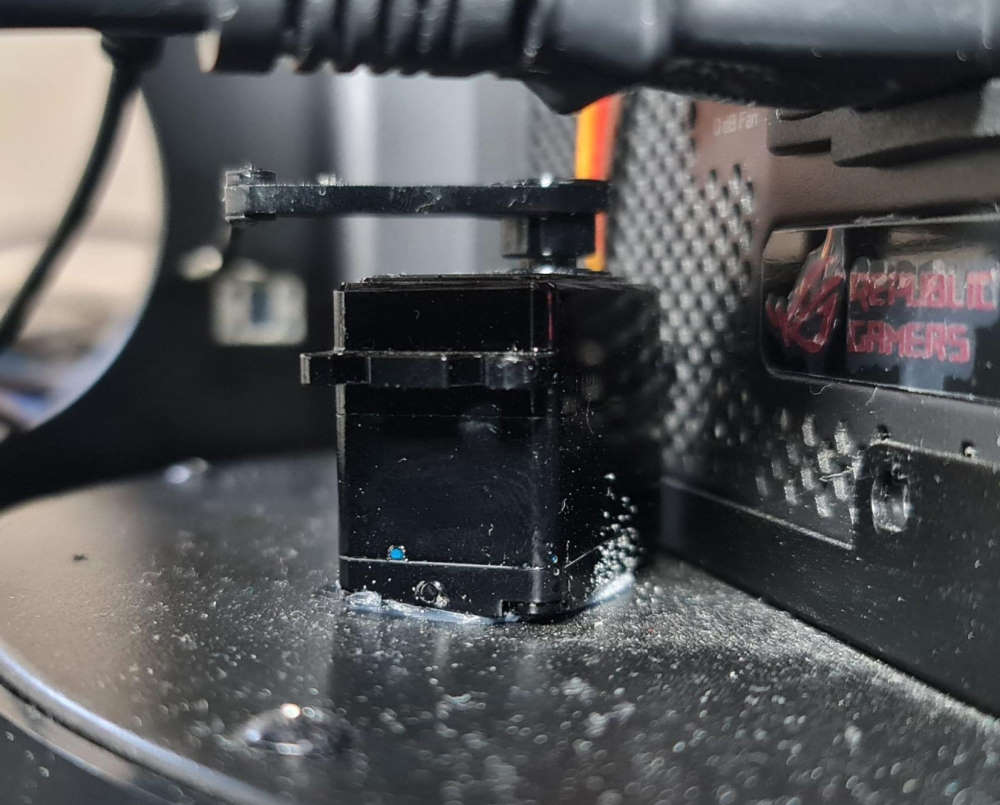
Readytosky 12kg Servo 180 Degree High Torque Full Metal Gear Low Profile Digital Servo (Another high torque alternative (6.6V Max))
Multi-voltage 4A Power Adapter with 7 interchangeable DC Plugs -
DC Power Extension Cable 1.5m length with 2.1mm plug and 2.5mm socket
Hardware
- Arduino UNO R3
- Screw Shield Terminal Expansion Board for Arduino Uno Board
- USB A to USB 4 Pin Header Cable
- Blue USB A to B cable
- Sullivan Servo Horn
- 2mm Sullivan Clevis
- 2mm Dubro threaded Rod
- Readytosky 12kg Servo 180 Degree High Torque Full Metal Gear Low Profile Digital Servo (Another high torque alternative) -
- Multi-voltage 4A Power Adapter with 7 interchangeable DC Plugs -
- DC 5521 to 5525 Coupling
- DC Power Extension Cable 1.5m length with 2.1mm plug and 2.5mm socket
- 22 AWG Red Wire
- 22 AWG Black Wire
- 22 AWG Orange Wire
- Various Heat Shrink
- Pololu JR Male Crimps
- Pololu JR Female Crimps
- Pololu JR Single Pin Housing
- Pololu JR 3 pin Housing
- Pololu JR Crimp Tool
Software Setup
Download, and install Arduino IDE (https://www.arduino.cc/en/software).
Install the VarSpeedServo library (files in the GitHub below) - A good guide on how to to install libraries manually)
Upload the sketch (also found in the GitHub below)
// 5-2-2022 added serial print // 27-01-2022 project 'autozem' // servos controlled - e.g 'L50' (move left servo 50º) and/or 'R50' (move right servo 50º). Arduino will accept upper and lower case. // servos move at the same speed. (this can be changed at the bottom of the sketch) // servos move independent of eachother thanks to varspeedservo.h interrupt method // servos dont move to default location after board reset thanks to saving last entered serial angle in EEPROM and loading before servo is attached. // ** Arduino UNO R3 board has auto-reset disabled ** (need to add switch for easier sketch uploading) // Varspeed library download http://www.glassier.biz/autozem/VarSpeedServo-master.zip // use with HWiNFO #include#include int eeaddr1 = 0; //sets EEPROM address to use for storing servo1 last angle int eeaddr2 = 10; //sets EEPROM address to use for storing servo2 last angle char buffer[11]; VarSpeedServo servo1; //create a servo object VarSpeedServo servo2; //create a second servo object void setup() { servo1.write(EEPROM.read(eeaddr1)); //sets servo1 last angle before attaching so no erratic movement servo2.write(EEPROM.read(eeaddr2)); //sets servo2 last angle before attaching so no erratic movement servo1.attach(9); //attaches servo1 on pin 9 to the servo1 object servo2.attach(10); //attaches servo2 on pin 10 to the servo2 object Serial.begin(115200); while (Serial.available()) Serial.read(); } void loop() { if (Serial.available() > 0) { // Check if data has been entered int index = 0; delay(100); //let the buffer fill up int numChar = Serial.available(); // Find the string length if (numChar > 10) { numChar = 10; } while (numChar--) { //fill the buffer with the string buffer[index++] = Serial.read(); } buffer[index] = '\0'; splitString(buffer); //run splitString function } } void splitString(char* data) { char* parameter; parameter = strtok (data, " ,"); //String to token while (parameter != NULL) { // If we haven't reached the end of the string... setServo(parameter); // ...run the setServo function parameter = strtok (NULL, " ,"); } while (Serial.available()) Serial.read(); } void setServo(char* data) { int SPEED1 = 5; //servo1 speed. lower is slower int SPEED2 = 5; //servo2 speed. lower is slower if ((data[0] == 'L') || (data[0] == 'l')) { int firstVal = strtol(data + 1, NULL, 10); // String to long integer firstVal = constrain(firstVal, 1, 179); // Constrain values servo1.write(firstVal, SPEED1); EEPROM.update(0, firstVal); //save last entered serial angle for servo1 to EEPROM Serial.print("Rear Servo is set to: "); Serial.println(firstVal); } if ((data[0] == 'R') || (data[0] == 'r')) { int secondVal = strtol(data + 1, NULL, 10); // String to long integer secondVal = constrain(secondVal, 1, 179); // Constrain the values servo2.write(secondVal, SPEED2); EEPROM.update(10, secondVal); //save last entered serial angle for servo2 to EEPROM Serial.print("Front Servo is set to: "); Serial.println(secondVal); } }
(if your auto-reset is disabled see ‘Problems Encountered’ section for workaround )
Download, install Python 3.10.
https://www.python.org/downloads/release/python-3101/
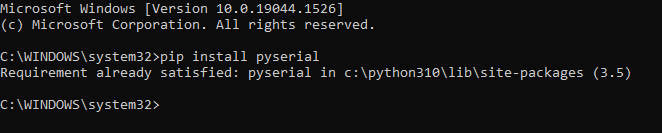
Open command prompt and install the pyserial library for python.
pip install pyserial
Download, and install HWiNFO.
https://www.hwinfo.com/download/

Open regedit and navigate to the following key…
“Computer\HKEY_CURRENT_USER\SOFTWARE\HWiNFO64\Sensors”
Create two new keys Custom and Custom so you now have…
“Computer\HKEY_CURRENT_USER\SOFTWARE\HWiNFO64\Sensors\Custom\Custom”
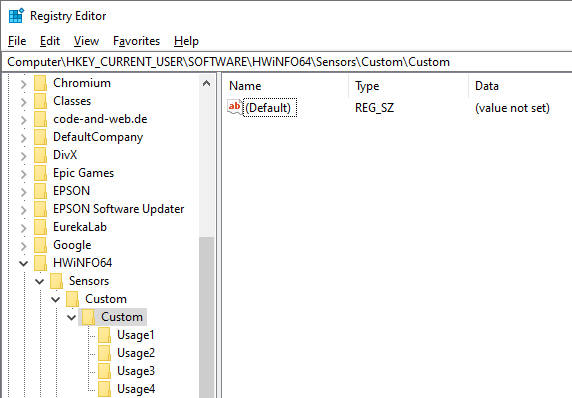
Create the following keys:
Computer\HKEY_CURRENT_USER\SOFTWARE\HWiNFO64\Sensors\Custom\Custom\Usage1
Computer\HKEY_CURRENT_USER\SOFTWARE\HWiNFO64\Sensors\Custom\Custom\Usage2
Computer\HKEY_CURRENT_USER\SOFTWARE\HWiNFO64\Sensors\Custom\Custom\Usage3
Computer\HKEY_CURRENT_USER\SOFTWARE\HWiNFO64\Sensors\Custom\Custom\Usage4
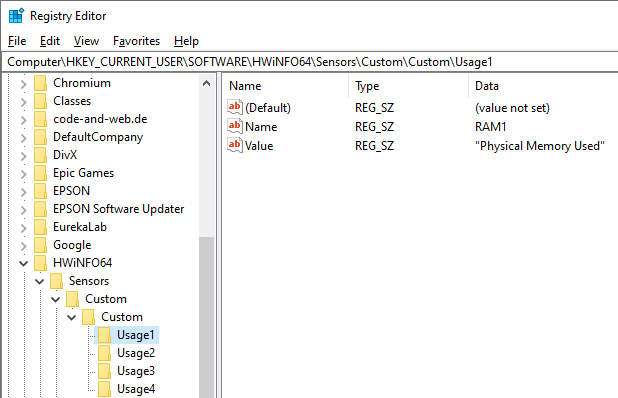
Under each key (Usage1, etc) create the following strings under each key, changing the name respectively…
new string → name = Name, data = whateveryouwanttocallit
new string → name = Value, data = “Physical Memory Used” (include quotations)
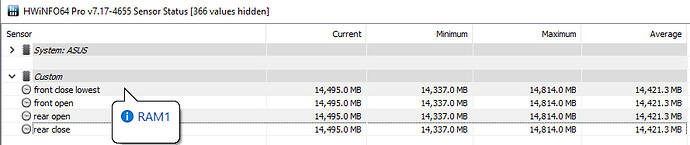
in HWiNFO it will look like this… ( i have renamed mine so yours will say RAM1 etc… )
Now we can set up the alert settings in HWiNFO…
Download the following files…
http://www.glassier.biz/autozem/front_close.bat
http://www.glassier.biz/autozem/front_close.bat
http://www.glassier.biz/autozem/front_open.bat
http://www.glassier.biz/autozem/rear_open.bat
http://www.glassier.biz/autozem/rear_close.bat
http://www.glassier.biz/autozem/front_close.pyw
http://www.glassier.biz/autozem/front_open.pyw
http://www.glassier.biz/autozem/rear_open.pyw
http://www.glassier.biz/autozem/rear_close.pyw
Mine are placed under
c:\autozem\
.BAT (batch) files are linked to the python files and at the time of writing this HWiNFO only accepted .exe or .bat files for running a program on alert. The next version of HWiNFO will accept any file so the batch files can be removed.
.pyw (using .pyw over .py suppresses the console window upon execution) was used as this runs the script as a background process with no pop-up window upon execution.
Example of rear_close.pyw
import serial # tells python to use serial library
import time # tells python to use time library
ser = serial.Serial('COM6', 115200) # sets the serial comm port and baud rate
time.sleep(0.1) # wait 0.1s
ser.write(b'L140') # send command over serial
ser.close() # closes serial port
Right-click your first custom sensor and head to Alert Settings…
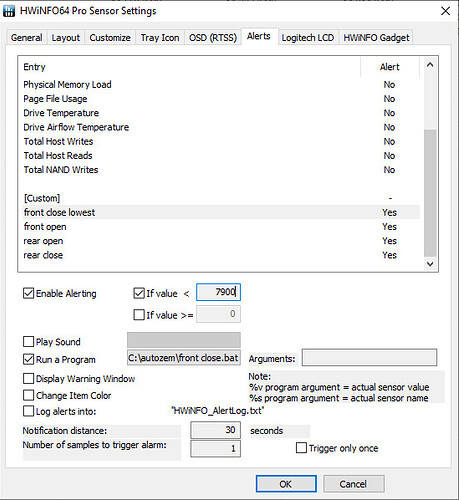
So for my basic operation and diagnostics, I set the following…
front close > 7900
front open > 8000
rear open > 8500
rear close > 8400
This way I could load RAM and unload RAM on-demand to simulate. The fundamentals are the same if you decide to use a different sensor like temperature. You may need to play around with ‘notification distance’ and ‘trigger only once’ sections to get it working how you want.
Notes
- Let any silicone cure for 72 hours.
- Use Arduino Monitor in Arduino IDE to find perfect angles then edit .pyw files to suit your needs.
- Connect pushrod to servo ONLY when you know everything works fine else you run the risk of shearing the servo horn from the surface. If the stored angle is different from the current servo angle upon powering up, the servo will move at full speed.
- Mirror of project files can be found at https://github.com/zemerdon/autozem
Problems Encountered
- Problem:- Servo would reset to the default position ( 90º for these servos ) every time the serial port was opened to Arduino.
- Solution:- Found out that every time the serial port was opened Arduino performed an auto-reset. Disable auto-reset on the Arduino board to overcome this.
- Adverse problem:- Disabling auto-reset now makes the traditional way to upload a sketch null. But there are two workarounds.
- Workaround 1:- Install a switch to the broken auto-reset trace. ON would enable auto-reset allowing you to upload your sketch normally BUT reset the servo to default position every time you open the serial port to issue your command. OFF would disable auto-reset and allow servos to operate properly but sketch uploading is affected. So basically, switch ON to upload your sketch then switch OFF afterward, to normal operation.
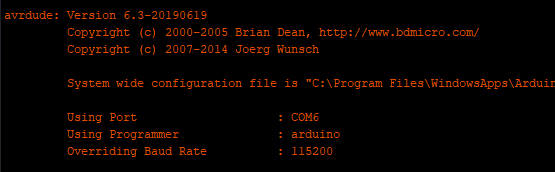
- Workaround 2:- Whilst in Arduino IDE when you click upload, hit RESET on your Arduino board as soon as you see ‘Overriding Baud Rate’ pop up. You have a couple of seconds to do this. Arduino IDE will continue to upload the sketch normally. The video on this is: Arduino Uno R3 Auto-Reset DISABLE
- Problem:- Power consumption. I initially used 4xAA independent battery packs for each of the servos. Unfortunately, the servos require 4.8v to operate so it wouldn’t take long before the batteries fell below this line, rendering the servos intermittent and then eventually fail.
- Solution:- Replace battery packs with a power supply.
- Problem:- HWiNFO wouldn’t recognize my python scripts to trigger the desired alarm setting. HWiNFO only supported executing .EXE and .BAT files for alert triggers.
- Solution:- Create a batch file to call the python script. Also contacted the developers and they will be adding support for any file to be executed for alert triggers in the next release.
- Potential Problem:- Possibly with many cables at the rear making the rear panel heavier and creating more resistance for the 12kg servo, this servo may be too small and stall easily.
- Solution:- Upgrade to SPT5435LV-180 35kg. Found here - https://www.banggood.com/search/spt5435lv-180-35kg.html
- Problem:- Servo would reset to the default position ( 90º for these servos ) every time the serial port was opened to Arduino.
- Solution:- Found out that every time the serial port was opened Arduino performed an auto-reset. Disable auto-reset on the Arduino board to overcome this.
- Adverse problem:- Disabling auto-reset now makes the traditional way to upload a sketch null. But there are two workarounds.
- Workaround 1:- Install a switch to the broken auto-reset trace. ON would enable auto-reset allowing you to upload your sketch normally BUT reset the servo to default position every time you open the serial port to issue your command. OFF would disable auto-reset and allow servos to operate properly but sketch uploading is affected. So basically, switch ON to upload your sketch then switch OFF afterward, to normal operation.
- Workaround 2:- Whilst in Arduino IDE when you click upload, hit RESET on your Arduino board as soon as you see ‘Overriding Baud Rate’ pop up. You have a couple of seconds to do this. Arduino IDE will continue to upload the sketch normally. The video on this is: Arduino Uno R3 Auto-Reset DISABLE
- Problem:- Power consumption. I initially used 4xAA independent battery packs for each of the servos. Unfortunately, the servos require 4.8v to operate so it wouldn’t take long before the batteries fell below this line, rendering the servos intermittent and then eventually fail.
- Solution:- Replace battery packs with a power supply.
- Problem:- HWiNFO wouldn’t recognize my python scripts to trigger the desired alarm setting. HWiNFO only supported executing .EXE and .BAT files for alert triggers.
- Solution:- Create a batch file to call the python script. Also contacted the developers and they will be adding support for any file to be executed for alert triggers in the next release.
- Potential Problem:- Possibly with many cables at the rear making the rear panel heavier and creating more resistance for the 12kg servo, this servo may be too small and stall easily.
- Solution:- Upgrade to SPT5435LV-180 35kg. Found here - https://www.banggood.com/search/spt5435lv-180-35kg.html
- Problem :- Servo would reset to default position ( 90º for these servos ) every time the serial port was opened to Arduino.
- Solution:- Found out every time the serial port was opened Arduino performed an auto reset. Disable auto-reset on the Arduino board to overcome this.
- Adverse problem:- Disabling auto-reset now makes the traditional way to upload a sketch null. But there are two workarounds.
- Workaround 1:- Install a switch to the broken auto-reset trace. ON would enable auto-reset allowing you to upload your sketch normally BUT reset the servo to default position every time you open the serial port to issue your command. OFF would disable auto-reset and allow servos to operate properly but sketch uploading is affected. So basically, switch ON to upload your sketch then switch OFF afterward, to normal operation.
- Workaround 2:- Whilst in Arduino IDE when you click upload, hit RESET on your Arduino board as soon as you see ‘Overriding Baud Rate’ pop up. You have a couple of seconds to do this. Arduino IDE will continue to upload the sketch normally. The video on this is: Arduino Uno R3 Auto-Reset DISABLE
##### VIDEO EMBEDED #####
- Problem:- Power consumption. I initially used 4xAA independent battery packs for each of the servos. Unfortunately, the servos require 4.8v to operate so it wouldn’t take long before the batteries fell below this line, rendering the servos intermittent and then eventually fail.
- Solution:- Replace battery packs with a power supply.
- Problem:- HWiNFO wouldn’t recognize my python scripts to trigger the desired alarm setting. HWiNFO only supported executing .EXE and .BAT files for alert triggers.
- Solution:- Create a batch file to call the python script. Also contacted the developers and they will be adding support for any file to be executed for alert triggers in the next release.
- Potential Problem:- Possibly with many cables at the rear making the rear panel heavier and creating more resistance for the 12kg servo, this servo may be too small and stall easily.
- Solution:- Upgrade to SPT5435LV-180 35kg. Found here - https://www.banggood.com/search/spt5435lv-180-35kg.html
Wiring Setup

Software Setup
Gallery
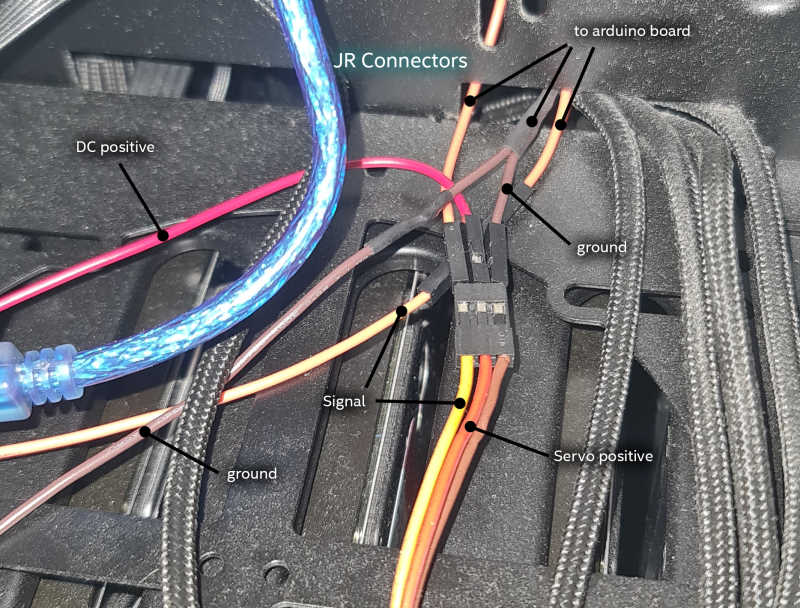
Close-up of servo junctions using JR connectors.
Front servo mounted with silicone.
Rear servo mounted with silicone.

Arduino mounted to Inwin915 SSD plate with silicone.
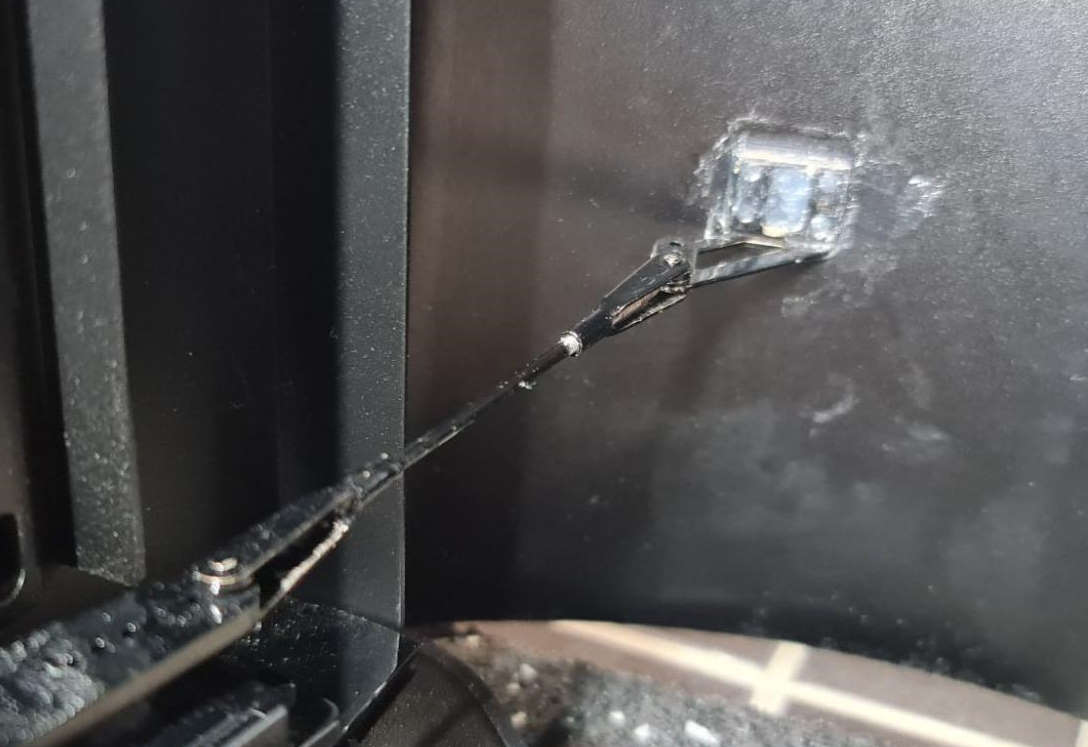
Servo > servo horn > clevis > pushrod > clevis > surface horn > PC panel.

AUTO-RESET disabled on Arduino UNO R3 board using a craft knife.

