Introduction
In this guide, we'll get a Raspberry Pi Pico W to send and receive data to the cloud using the MQTT protocol.
To follow along, all you'll need is:
- A Raspberry Pi Pico W
- Understand how to connect the Pico W to WiFi
- Understand how to program the Pico W using Thonny
Contents:
What is MQTT?
MQTT is a publish/subscribe messaging protocol that enables devices to broadcast and recieve messages in a simple manner. It's lightweight and efficient design makes it an ideal and very popular choice for communication between Internet of Things devices via the Cloud.
MQTT uses the concept of 'topics' - devices that are interested in a topic can subscribe to it, and other devices that have something to say can publish messages to it. When the topic receives a new message all subscribers to the topic are sent that message. The flexibility of topics underlies the power of using MQTT for IOT, and in this guide we will cover both publishing and subscribing to topics.
Adafruit IO
Before we can use MQTT we'll need an MQTT broker, for this guide we'll be using the Adafruit IO platform and it's free MQTT broker service. Note that Adafruit IO is not the only option, it's just the one we chose for this guide. There are many other free MQTT services out there such as HiveMQ or MQTTHQ, and you can even run your own MQTT broker on something as small as a Raspberry Pi Zero W using free software such as Mosquitto. For even more options check out the Cloud section on this Awesome MQTT List and Moxd Lab's list of public brokers.
Adafruit IO also provides easy-to-use dashboards with charts, buttons, and much more - so we'll use those as well to demonstrate our Pico W successfully communicating over MQTT.
Head over io.adafruit.com and sign up for a free account.
Obtain Adafruit IO Key
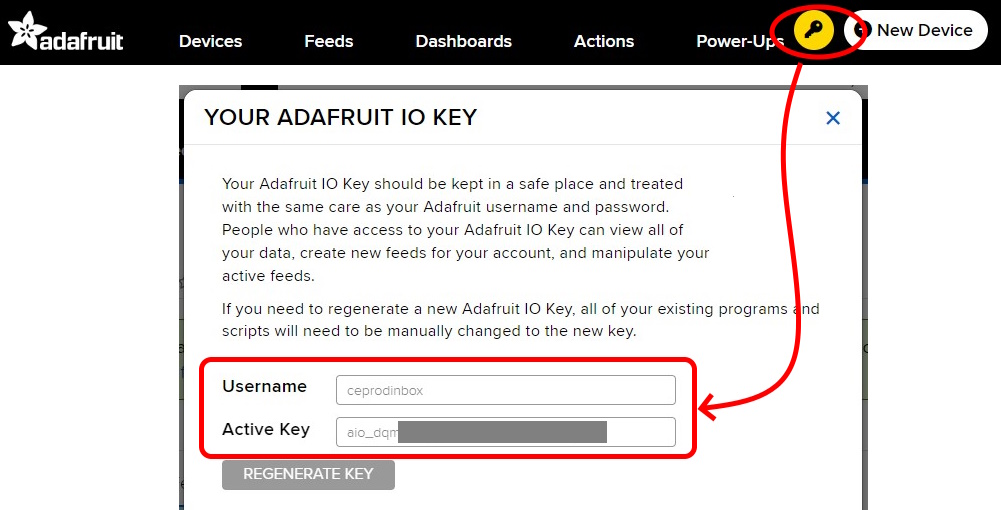
To authenticate with the Adafruit IO MQTT server we will need our Adafruit IO username and key. Click the yellow Key icon in the header and generate a key for your account. Take note of the key, we will use it later.
Create a Feed
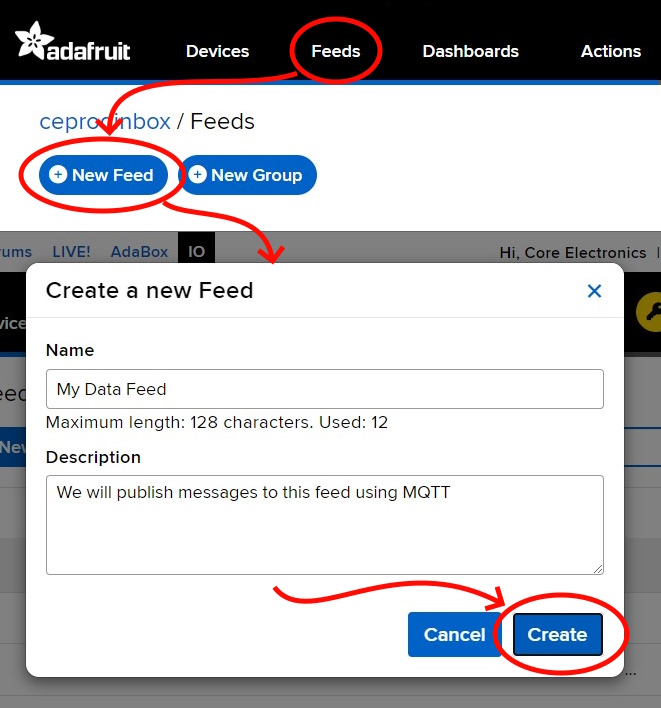
To publish or subscribe to topics using Adafruit IO's MQTT server we first need to create a 'Feed' in the Adafruit IO dashboard, which will become the MQTT Topic that we'll soon publish messages to!
Using the account you just created, go to 'Feeds' and click 'New Feed'. Give the feed a name and optionally a description, and click 'Create'.
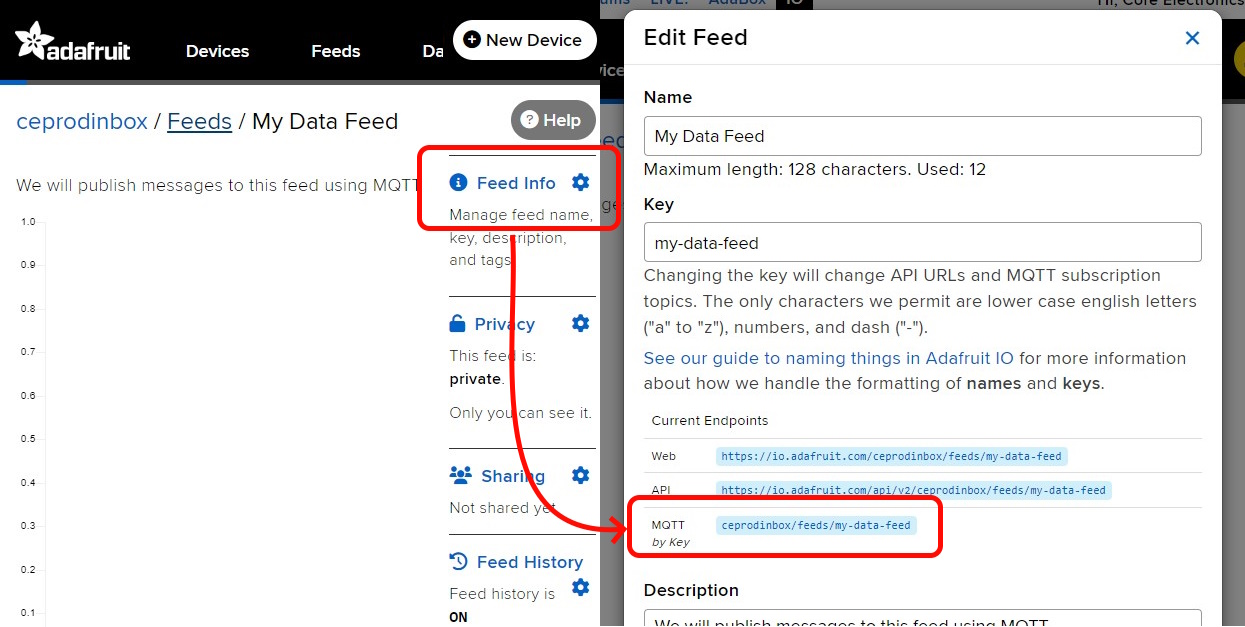
After creating the Feed, make a note of the MQTT Topic name by opening the Feed and clicking 'Feed Info'. The MQTT Topic is listed next to the label 'MQTT by Key' - take note of this, we're going to need it later on.
Create a Dashboard
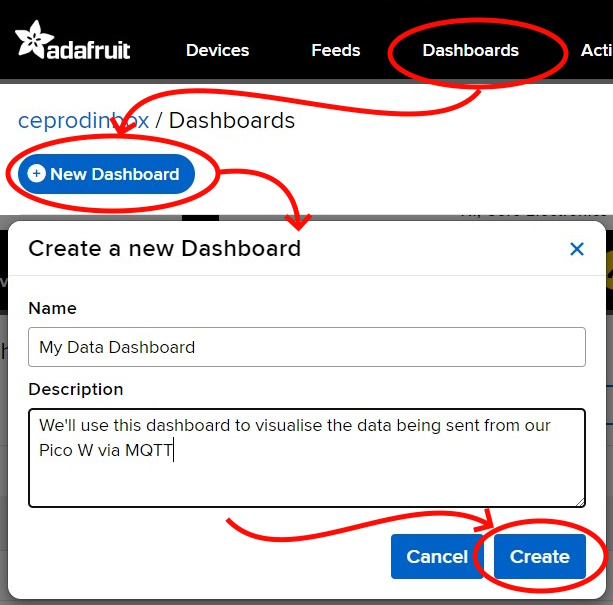
Now that we have our feed, the final step is to create a Dashboard with a Line Graph so we can visualise our data. Go to 'Dashboards' and click 'New Dashboard'.
We can add a Line Chart by going into the newly created Dashboard, clicking the cog icon, clicking 'Add Block', and then selecting the Line Chart block type.
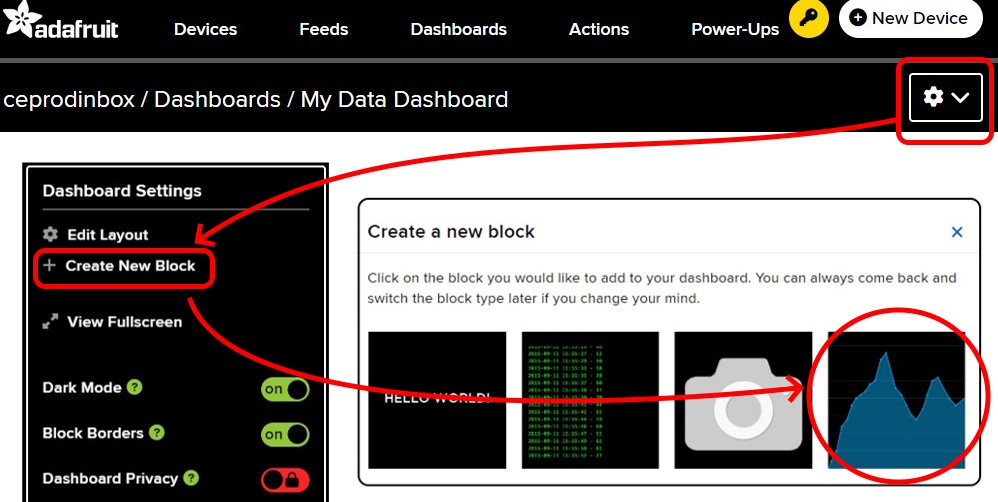
We need to tell the Line Chart to visualise data from our MQTT topic, so in the 'Connect Feeds' dialog select the Feed you created earlier and click 'Next Step'. We also want to see our data in realtime, so set 'Show History' to 'Live (no history) in the Block Settings dialog, and finally click 'Create Block'. Note: All other block settings are fine left at their defaults.
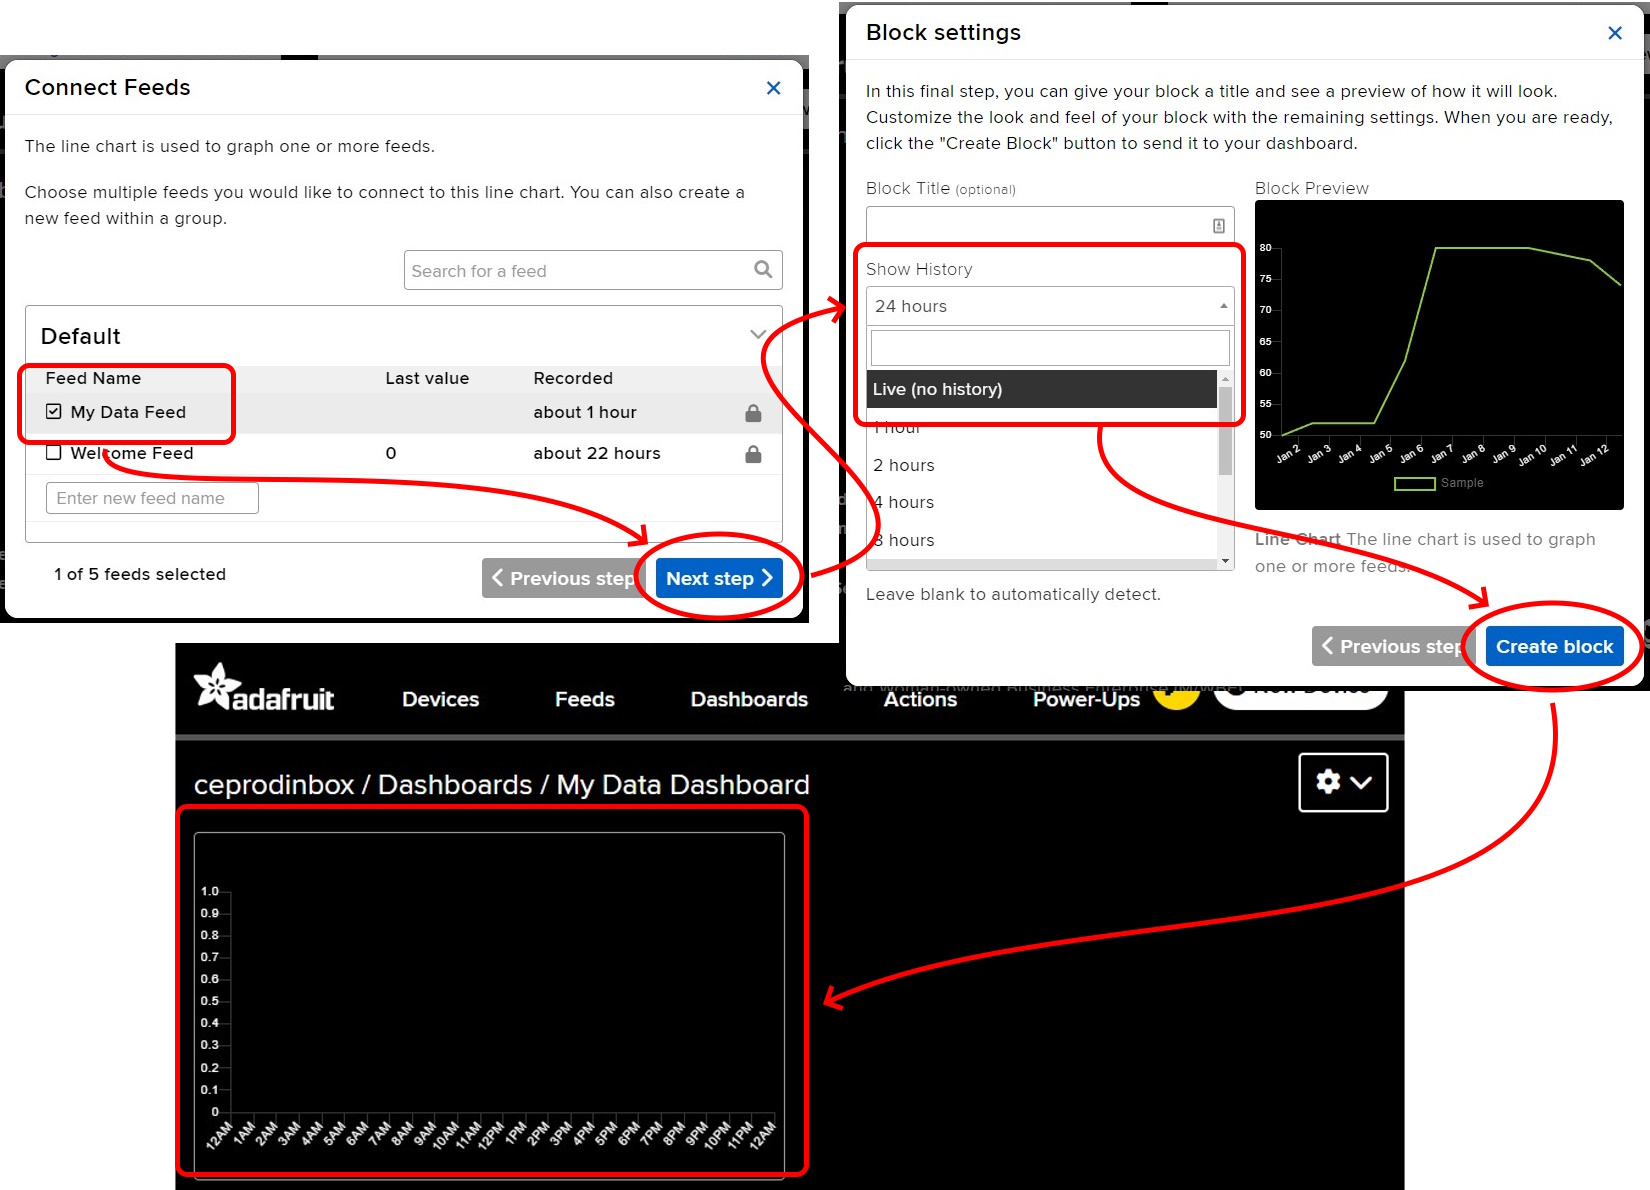
The Dashboard should now show a blank graph. We're now ready to publish some data from the Pico W and see it in realtime on Adafruit IO!
Setting up the Pico W for MQTT
To make life easier we will be using a library for MicroPython that will do most of the MQTT heavy lifting for us: micropython-umqtt.simple.
Connect your Pico W to the computer and fire up Thonny then using 'Tools' > 'Manage Packages' install the 'micropython-umqtt.simple' package onto your Pico W.
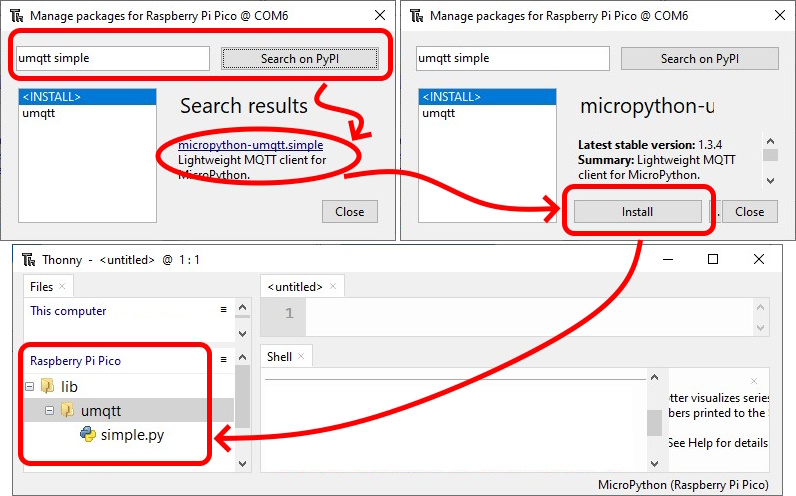
You can confirm the package has been installed if it is listed under the Raspberry Pi Pico file listing in Thonny.
Example: Publish data using MQTT
Let's see publishing messages with MQTT in action. In this example we're going to publish a number that changes every few seconds to our topic, and then observe that the topic is receiving the messages by way of our Line Chart in Adafruit IO.
Create a new script (File > New) and copy the following code into the blank script:
"""
A simple example that connects to the Adafruit IO MQTT server
and publishes values that represent a sine wave
"""

import network
import time
from math import sin
from umqtt.simple import MQTTClient

# Fill in your WiFi network name (ssid) and password here:
wifi_ssid = ""
wifi_password = ""

# Connect to WiFi
wlan = network.WLAN(network.STA_IF)
wlan.active(True)
wlan.connect(wifi_ssid, wifi_password)
while wlan.isconnected() == False:
    print('Waiting for connection...')
    time.sleep(1)
print("Connected to WiFi")

# Fill in your Adafruit IO Authentication and Feed MQTT Topic details
mqtt_host = "io.adafruit.com"
mqtt_username = ""  # Your Adafruit IO username
mqtt_password = ""  # Adafruit IO Key
mqtt_publish_topic = ""  # The MQTT topic for your Adafruit IO Feed

# Enter a random ID for this MQTT Client
# It needs to be globally unique across all of Adafruit IO.
mqtt_client_id = "somethingreallyrandomandunique123"

# Initialize our MQTTClient and connect to the MQTT server
mqtt_client = MQTTClient(
        client_id=mqtt_client_id,
        server=mqtt_host,
        user=mqtt_username,
        password=mqtt_password)

mqtt_client.connect()

# Publish a data point to the Adafruit IO MQTT server every 3 seconds
# Note: Adafruit IO has rate limits in place, every 3 seconds is frequent
#  enough to see data in realtime without exceeding the rate limit.
counter = 0
try:
    while True:
        # Generate some dummy data that changes every loop
        sine = sin(counter)
        counter += .8

        # Publish the data to the topic!
        print(f'Publish {sine:.2f}')
        mqtt_client.publish(mqtt_publish_topic, str(sine))

        # Delay a bit to avoid hitting the rate limit
        time.sleep(3)
except Exception as e:
    print(f'Failed to publish message: {e}')
finally:
    mqtt_client.disconnect()
Enter your WiFi details in the script, along with the MQTT username, password, and topic using the details gathered from Adafruit IO in the earlier steps.
Save and run this script. While it is running open your Adafruit IO dashboard in a browser, and all going well you should see the Line Chart beginning to populate - and continue to change every 3 seconds:
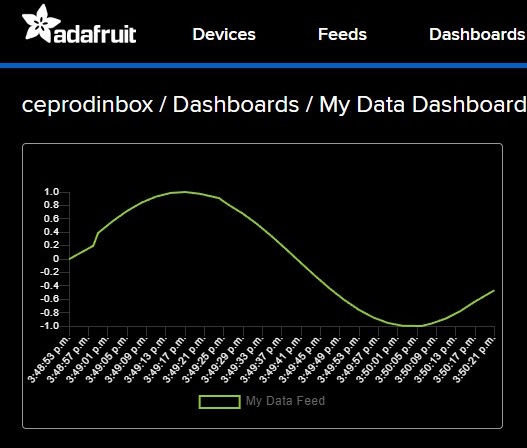
You may notice that the majority of the script is just for establishing the WiFi and MQTT connections, once these are both connected it takes very little code to actually publish a message using umqtt. The publishing a value only takes one line: mqtt_client.publish(topic, message).
Example: Receiving data using MQTT with Subscribe
In this example we're going to subscribe to a topic that receives on/off messages, and tell the Pico W to toggle it's onboard LED on and off when the appropriate message is received. We'll use the Adafruit IO dashboard to publish the on/off message to the topic using a Toggle widget.
Let's create a new topic using a new Adafruit IO feed so we're not mixing on/off messages with number messages from our previous example. Head back to Adafruit IO and create a new Feed, and take note of the MQTT topic in 'Feed Info' Note we'll reuse the dashboard we created earlier, so no need to create another one of those.
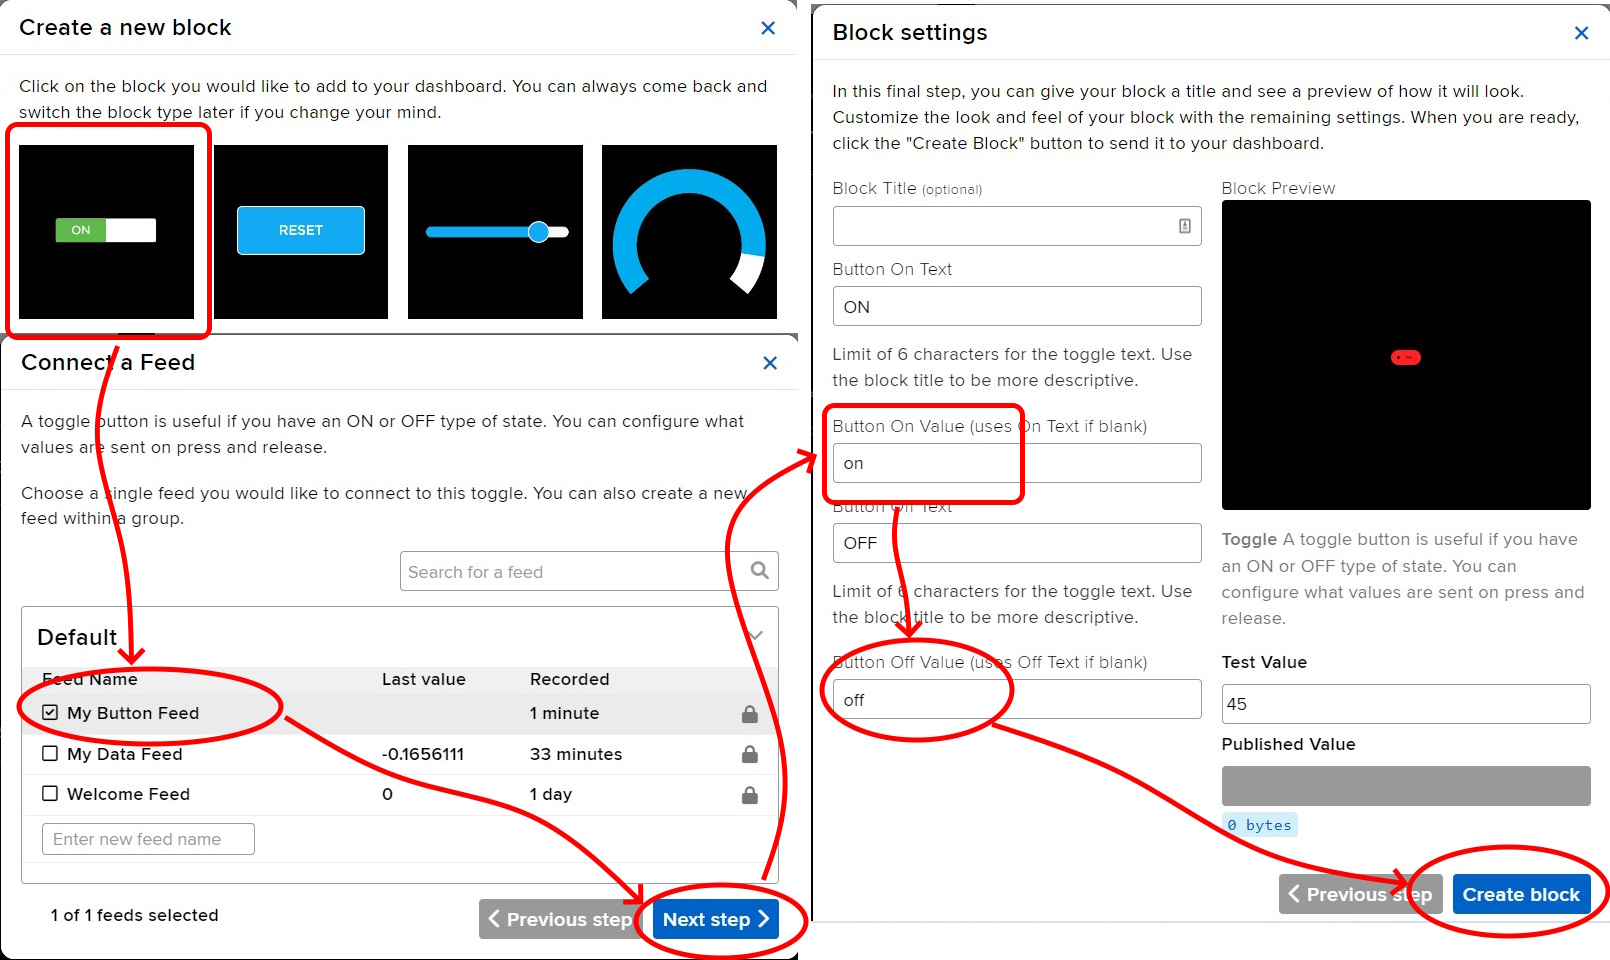
Open up the previous Adafruit IO dashboard and add a 'Toggle' widget. Select the Feed you just created in the 'Connect a Feed' dialog, and in 'Block Settings' set the 'Button On' and 'Button Off' values to "on" and "off". These are the values that will be sent to our new Topic when the toggle is clicked. You can also optionally give the Toggle a title.
That's it for the setup in Adafruit UI, you should now have a toggle showing on your Adafruit IO dashboard.

Let's head back to Thonny where we'll wire the Pico W up to the new topic and respond to it's messages. Don't completely close Adafruit IO though, we need it open to press the button!
Create a new script (File > New) and copy the following code into the blank script:
"""
A simple example that connects to the Adafruit IO MQTT server
and subscribes to a topic, which will signal the onboard LED
to turn ON or OFF
"""

import time
import network
from machine import Pin
from umqtt.simple import MQTTClient

# Setup the onboard LED so we can turn it on/off
led = Pin("LED", Pin.OUT)

# Fill in your WiFi network name (ssid) and password here:
wifi_ssid = ""
wifi_password = ""

# Connect to WiFi
wlan = network.WLAN(network.STA_IF)
wlan.active(True)
wlan.connect(wifi_ssid, wifi_password)
while wlan.isconnected() == False:
    print('Waiting for connection...')
    time.sleep(1)
print("Connected to WiFi")

# Fill in your Adafruit IO Authentication and Feed MQTT Topic details
mqtt_host = "io.adafruit.com"
mqtt_username = ""  # Your Adafruit IO username
mqtt_password = ""  # Adafruit IO Key
mqtt_receive_topic = ""  # The MQTT topic for your Adafruit IO Feed

# Enter a random ID for this MQTT Client
# It needs to be globally unique across all of Adafruit IO.
mqtt_client_id = "somethingreallyrandomandunique123"

# Initialize our MQTTClient and connect to the MQTT server
mqtt_client = MQTTClient(
        client_id=mqtt_client_id,
        server=mqtt_host,
        user=mqtt_username,
        password=mqtt_password)


# So that we can respond to messages on an MQTT topic, we need a callback
# function that will handle the messages.
def mqtt_subscription_callback(topic, message):
    print (f'Topic {topic} received message {message}')  # Debug print out of what was received over MQTT
    if message == b'on':
        print("LED ON")
        led.value(1)
    elif message == b'off':
        print("LED OFF")
        led.value(0)

# Before connecting, tell the MQTT client to use the callback
mqtt_client.set_callback(mqtt_subscription_callback)
mqtt_client.connect()

# Once connected, subscribe to the MQTT topic
mqtt_client.subscribe(mqtt_receive_topic)
print("Connected and subscribed")

try:
    while True:
        # Infinitely wait for messages on the topic.
        # Note wait_msg() is a blocking call, if you're doing multiple things
        # on the Pico you may want to look at putting this on another thread.
        print(f'Waiting for messages on {mqtt_receive_topic}')
        mqtt_client.wait_msg()
except Exception as e:
    print(f'Failed to wait for MQTT messages: {e}')
finally:
    mqtt_client.disconnect()
Enter your WiFi details in the script, along with the MQTT username, password, and topic using the details gathered from Adafruit IO in the earlier steps.
Save and run this script. Once the Pico connects to MQTT and subscribes to the topic (watch for the message saying so in Thonny's console output) switch back to Adaruit IO and toggle the switch to the ON position. All going well the onboard LED on the Pico W should turn ON! Toggle the switch back off and the onboard LED will follow suit!
Example: Publish and Subscribe Combined
Devices using MQTT topics aren't to restricted either only publishling or only subscribing - a device can both subscribe to a topic and send data to that topic as well!
In Thonny, stop the current script execution and update the script so that when it starts it first turns off the onboard LED and publishes the off state to the MQTT topic. Don't run the script yet.
# ...

# Before connecting, tell the MQTT client to use the callback
mqtt_client.set_callback(mqtt_subscription_callback)
mqtt_client.connect()

# Set the initial state of the LED to off, and let the MQTT topic know about it
led.value(0)
mqtt_client.publish(mqtt_receive_topic, "off")

# Once connected, subscribe to the MQTT topic
mqtt_client.subscribe(mqtt_receive_topic)
print("Connected and subscribed")

# ...
With the script stopped, go to the Adafruit IO dashboard and toggle the button to ON - notice that the Pico W onboard LED is still off since the script has stopped and it did not receive the new message from the topic.
Now run the script and keep a close eye on the Toggle in the dashboard - the Pico W will have published to the topic that it is currently off, and since the Toggle is also subscribed to the topic, it will automatically update it's state to OFF in response to the message.
With the script still running, Toggle the button back to ON and the Pico W will turn it's LED back on!
Conclusion
We can see now that by leveraging MQTT on our Pico W we can easily join the internet of things and control hardware in the real world - in this guide we just used a button on a dashboard, but that's just the beginning! If you have any questions or need some help, start the conversation below. We're full-time makers and happy to help.
Happy making!

