8Bitdo have brought joy to many retro-gaming enthusiasts with their SF30 Pro Bluetooth controller. It’s a fantastic piece of gear, and one of our favourite controllers to use with a RetroPie setup. We’ve covered off on our thoughts on the controller in our 8Bitdo SF30 Pro Controller Overview. We’ve covered 8Bitdo controller mapping in general in our other RetroPie tutorials, but today, we’ll be looking specifically at mapping it to your RetroPie system.
Before you can set up your controller, you should make sure it is fully charged by connecting it to a powered USB port via the included USB C cable. When charging, the indicator LED will be red, and when it is fully charged, it will change to Green. The nice thing about USB C is that you can insert the cable in either orientation, the connector isn't polarised.
Navigating the User Interface
If this is the first time you’ve powered on your RetroPie system, you’ll need a second controller or a keyboard to navigate the user interface to pair the controller via Bluetooth. Fortunately, you can connect the SF30 Pro to any of the USB ports and use it just like a wired controller without requiring any Bluetooth pairing, and use that controller to pair your second. If you only have one, then you can always use a keyboard.
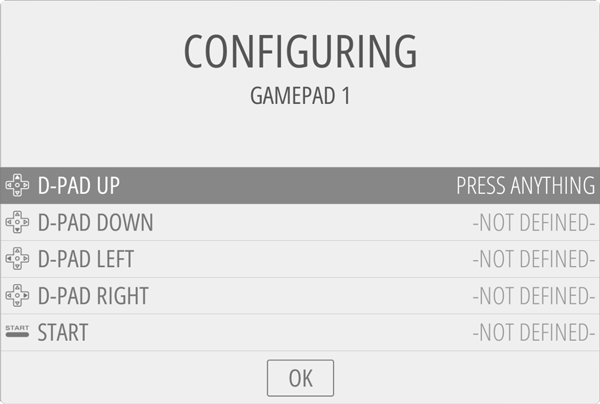
To configure the input of your wired controller/USB keyboard, press the start button from the main menu and choose ‘Configure Input’. If this is the first time booting up your RetroPie card, then the mapping screen will come up automatically after it boots (which takes about a minute). Go ahead and map the D-pad directional controls, as well as A, B, Start, and Select. Just press the corresponding button on your keyboard/controller. You can map them to any key you like, just make sure you remember what they are. To skip past un-used controllers, simply hold a button that you've already mapped, and it will skip to the next button. I recommend mapping the direction arrows for the D-pad, the matching letters for A and B, and Enter and Backspace for Start and Select. Once that is completed, you’ll be taken to the main RetroPie screen.
Bluetooth Pairing
To get Bluetooth devices up and running with RetroPie, we need to dive into the RetroPie config menu by clicking on the RetroPie option at the main screen. Navigate to Bluetooth and press ‘A’ to enter the Bluetooth configuration. You can navigate the menu here using the arrow keys on your keyboard/gamepad and using ‘enter’ to select. Now that we’re in the Bluetooth settings, follow the steps below to setup your 8Bitdo controller:

- There are different modes you can use for your 8Bitdo controller depending on what you’re connecting to, however, for the RetroPie, mode 1 is what you want. To use the controller in mode 1, simply power the controller on by holding the ‘Start’ button (different modes are accessed by holding different buttons combinations when powering on).
- Go to ‘Register and Connect to Bluetooth Device’, after searching for devices for a few seconds it will display all available Bluetooth devices. The 8Bitdo controller will either show up labelled as 8Bitdo*model*, however in our tests, it can take a few times for it to appear, so if it doesn’t show in the listed devices, press cancel, and then select ‘Register and Connect…’ again until it appears. Once visible, select the controller and hit enter, after a few seconds it will let you know if it was successfully connected.

- Now we need to go down to ‘Set up udev rule for Joypad’, select your 8Bitdo controller and press enter. This is required for your controller to work correctly.
- Go to ‘Configure Bluetooth connect mode’ which should be set to ‘default’ and change it to ‘background’. This will ensure that our controller is always connected to the Pi, even after a restart, otherwise we’d have to go back and connect it every time we turn the Pi on.
- The last step is to toggle the ‘8Bitdo mapping hack’ to ‘OFF’. This was required for a previous firmware version of the 8Bitdo controllers, but all new controllers come with updated firmware so we need to set it to OFF.


Repeat that process as required for each individual Bluetooth controller, and then exit back to the RetroPie main settings screen.
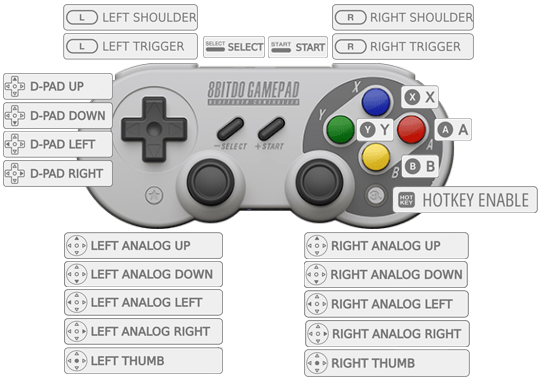
Go ahead and complete that process for each controller that you wish to connect. Once they’re paired via Bluetooth, you’ll see that the corresponding LED at the base of the controller will be lit up. Now we can go through and map all the controls using the same process we went through earlier. Go back to the main RetroPie menu by pressing ‘B’, press enter, and navigate to configure input. Follow the recommend mapping below, including the 8Bitdo ‘function’ button as the hotkey:
As with the Bluetooth pairing, repeat that process for each controller that you wish to configure, press A to finish the input configuration, and then press Enter to go back to the main RetroPie menu and you'll be able to play any emulator with your SF30 Pro. You may find that for some emulators, it's desirable to adjust the emulator mapping which buttons do what in your game. To assign custom mapping for emulators, take a look at our custom mapping tutorial. For more information on using 8Bitdo controllers or RetroPie, check out our other RetroPie tutorials, and enjoy your Retro gaming!

