The wires in our circuits are often forgotten when we are planning our next big project, but the right connectors will a make your project look more professional and a lot easier to work with! In this tutorial, we are going to have a quick look at the options that should be considered when selecting connectors. Then we are going to go through the whole process of making up and crimping some connectors. Let’s get started!
What We Need
- Crimping Tool: 0.08-0.5 mm² Capacity, 20-28 AWG
- Crimping Tool: 0.1-1.0 mm² Capacity, 16-28 AWG
- Hook-Up Wire
- Hakko Precision Flat Pliers
- Flush Cutters
- Wire Stripper
- Female Crimp Pins for 0.1" Housings
- Male Crimp Pins for 0.1" Housings
- Connector Housing: 1x1-Pin
- Crimp Connector Housing: 1x4-Pin
Connector Terminal
There are a lot of connectors on the market the simplest and most common is the 0.1” housing that can be seen on most prototyping cables. You can get a wide variety of connectors that have been applied to different applications. The JST connectors are commonly used with development kits due to their size and that they cannot be connected the wrong way. The Tamiya connectors are used a lot in RC (Remote Control) Vehicles as they can we attached to thick low gauge wire that allows a lot of current and prevents connecting batteries in reverse.

Wire Gauge
When choosing connectors it is easy to overlook the thickness of the cables, we measure cable thickness in AWG(American Wire Gauge) it goes from the thickest cables at 0000 through to the thinnest at 40.
If your wire gauge is low, then the smaller connectors are not going to work and if it is high you will have a hard time getting the wire to hold in the connector.
If you have chosen your connector already then it is usually a simple matter of finding a wire with a matching AWG. For example, the 0.1” housing pins work with 22-28 AWG cables so we have chosen to use AWG 22 as it is a good general purpose cable used a lot in prototyping. If your circuit will draw more than 1amp or you need very fine wires you may want to consider other options, but in most cases 22AWG is good.
A Quick Comparison of Two Crimpers
We are going to look at two crimping tools 0.1-1.0 mm Crimping Tool: and 0.08-0.5 mm Crimping Tool from Pololu. At first glance they are both quite similar they both have a solid high-quality feel and a nice ratchet action that makes crimping easy. Where these two units differ is in the teeth the 0.1-1.0mm has three much wider teeth and allows for a lot of versatility in crimping and is a lot easier to crimp larger connectors with.
The 0.08-0.5 mm Crimping Tool has only two much shorter teeth that allow it to crim shorter pins like those in DF Robot pack. Caution: The 0.1-1.0 mm Crimping Tool: cannot crimp the shorter connectors so make sure you have checked the pin length before buying.

While making this article we used both tools extensively and the wider pins make crimping the wider connectors a lot easier so if you need to crimp small pins and a lot of large pins it is worth getting both.
Constructing Custom Cables
I am going to focus on the 0.1” pin and housing, as these are common in maker electronics and are simple enough to make them a great place to start crimping. You will be able to apply the same ideas to most pin connectors, but if you run into any problems just ask on the discussion below and we will be more than happy to help you out. Now that we have chosen a connector and the tools let’s make some cables.
Cutting and Stripping Wires
The first step is to cut your wires to the correct length and to strip the ends. Make sure that you measure all your cables to the length you need before you start crimping so that your cables can be neat, and you don’t waste terminals. Once you have cut your wire to the right length you will need to strip the ends. This is very important as if you strip too much the connector will not grip the insulation or in the case of female connectors, it can jam the plug. If you don’t strip enough the conductor may not make contact and the new wire won't work.

For these pins, we need to strip to 3mm though this will depend on the pins you are using. There is no need to tin the wires, and in fact, it can do more harm than good with this style of crimp connector.
In the next picture, we can see why we need to be careful with the wire strip and how to place the wire in the terminal.
Conductor Placement

- The insulation needs to be in the blue zone with the large tabs so that the connector is held firmly in place.
- The conductor needs to be in the green zone with the smaller tabs so that the wire can make good contact.
- There should be no wire in the red zone, this is particularly important for female connectors as they will not work correctly if there is a part of the wire in that area.
These rules will apply to any connectors that you use and you can use this placement to make sure you have stripped your wires to the correct length.
Crimping Pins
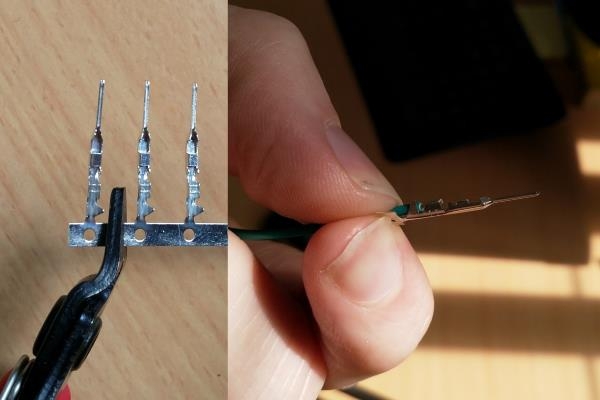
When cutting pins from the strip you may be tempted to pull them off the backing, don’t! Holding the pin by the tab as shown makes assembling the cables much easier, and safer. You can then cleanly cut the tab off after you have finished crimping.
The next step is to place the pin into the appropriate tooth of the tool, the chart at the top of this tutorial has a guide for which cable gauge should be used with each tooth. We found that in the case of the .1" pins it was better to use a smaller tooth than recommended. Make sure you are careful to get the placement right as if you crimp too close to the end the insulation grip might be missed and you will have a weak end and too close to the wire may result in the wire holding but a poor electrical connection.

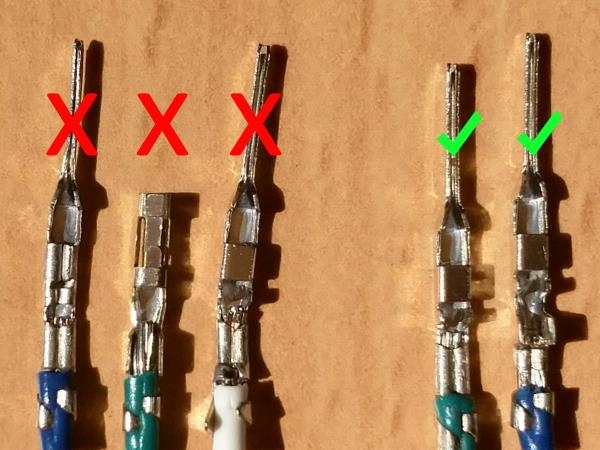
When crimping with a tool that is shorter than the connector you will need to decide based on which is more important, though in our experience the insulator tabs and half the conductor as shown in the picture gave the best results. It would be extremely difficult or impossible to crimp the shorter pins with the wider teeth so please be careful when choosing pins and the tool for your project. Below we can see examples of how the crimping can go wrong and how we want the crimp to look.
Housing Pins
Once your terminals are all crimped you can start using them to connect things, or you can add housings to your pins. there are a lot of options when it comes to housing we are going to use the simplest one we could find, the Connector Housing for 0.1" crimp. To attach the housing we just push the pin into the housing with the wire side of the pin facing the hole on the face of the housing until you feel it “click” into place.It can take a little bit of effort but if you are finding it too difficult the most common problem we found was the the insulation connector had not crimmped small enough so using a pair of pliers to squese them should allow you to attach the housing easily. There are a lof of different connectors that you can get in various sizes and types though they all all are attached in an almost identical way. Note: If you accidentally add the wrong housing it is possible to remove it by lifting the tab on the back and pulling the pin out.

Time To Make Spaghetti!
Now that we have gone over the basics you will be able to make connectors of any type you like, you can even mix and match ends so that you can connect devices that would otherwise require soldering new terminals on (Be very careful when doing this that the devices are electrically compatible), We would love to hear about the custom connectors and any amazing wiring you have done in the discussion and as always if you get stuck or want to expand on the idea presented here just post below and we will help out. See you next time!


