By now you’re probably loving the platform that is Particle and all these crazy ideas of how to create the next big IoT thing (Internet of Things thing…hmm), but for many inventors, the stumbling block is integrating your creation, with your smartphone. With virtually every phone on the market being a ‘smartphone’ with internet capability, apps etc. it’s the perfect way to control devices, however developing at app specifically for Android or iPhone can be quite challenging for most people. A team of like-minded inventors has realised this and created a way to make your own smartphone app to control any internet connected board (not just Particle), with no coding required!
Which brings us to Blynk.
 What is Blynk?
The idea of Blynk is simple. Use the provided libraries with your device of choice, use drag and drop widgets to create the GUI (Graphic User Interface) that you’ve always dreamed of, then turn that interface into a standalone app that you can put up on the app store of your choice!
The best bit is that you can control every pin of your board simply by using the built in example, no extra coding required!
So let’s take a look at using our Particle device with Blynk:
The Gear
The complete this tutorial you’ll require the items on the project wishlist here: http://coreelec.io/1h
Whilst you can get started with Blynk using just a Particle board and your phone, we’ll be connecting up extra bits and pieces to demonstrate some broader functionality of the Blynk app.
Bear in mind that whilst we’re using a Particle Photon board in this tutorial, all of the examples will work just as well with a Particle Electron board, just remember the data usage and costs with using the Electron.
The Goal
Today we’ll be going through connecting up a variety of different components to the Photon and controlling outputs, viewing inputs and creating data graphs, all inside of the Blynk app. This tutorial uses the Particle.io IDE and other features of the Particle.io platform, so if you haven’t already, we highly recommend checking out our other Particle tutorials for more info.
Configuring Blynk Library
The first thing we need to do is to download the Blynk app. It’s available on for both Android and iOS from the respective app stores, create an account or sign in using Facebook, and you should come to the Blynk project screen showing your various masterpieces. Now you want to create a new project, give it a name and select the appropriate board type. Notice the alpha-numeric AUTH TOKEN at the bottom (the crazy long random string of numbers and letters), you’ll need to put this into your Particle code to get everything to work together.
Now go to build.particle.io, search for ‘Blynk’ in the library tab and include it in your app. Now if you go into the Blynk library, at the top you should see a file called ‘01_PARTICLE.INO’. This is the example provided by Blynk which will allow your Particle board to work with the widgets on the app. Copy the entire program and paste it into your app.
You’ll see up the top a variable called ‘auth’ with the string “YourAuthToken”, go ahead and replace that with the auth token you were provided in the Blynk app on your phone (be sure to keep the “” around your token: “0123456789”).

**Note that the authentication token will be different for each Blynk project, so if you create a new project in Blynk, you’ll need to adjust and re-upload your code to match**
Now that you’ve done this, flash your app to your Particle board and let’s create some widgets in the Blynk app to control our Photon.
Using Blynk
The idea of blynk is that you can drag and drop widgets to create the perfect UI (User Interface). To add a widget, simply tap anywhere on the screen that is blank and it will bring up the widget box on the side. There’s an incredible amount of depth available using these widgets (with more being added regularly) so it’s worthwhile checking them all out, however widgets cost ‘energy’. Your account has an energy balance and different widgets cost different amounts of energy, and if you run out, you either have to delete existing widgets, or make an in-app purchase (only a few dollars) to increase your energy cap. Each widget will need to be configured to work properly. To configure a widget, tap on it, and the widget settings will appear. Here you can select which pins the widget corresponds to on your hardware, how it behaves, and other settings.
To get started, let’s create a button in our project to turn on the on-board LED on our Photon by doing the following:
- Tap on some blank space in your project to bring up the widget menu
- Tap the button option to add it to your project
- Tap on the button widget in your project to bring up the button settings
- Tap on the PIN box and select Digital pin D7 (on-board LED)
- Choose whether you want your button to act like a momentary switch, or a toggle switch in the mode selection
- Tap OK to close the widget settings


Now that we’ve created the interface that we want, tap on the triangular ‘play’ button in the top right hand corner and our project will connect to the Photon and run. Now tap on the button and the blue on-board LED should turn on.
Awesome sauce, you just created the user interface for your very own smartphone app! Good job. As fun and all as that is, it doesn’t really do much and isn’t very exciting, so let’s add some circuitry to create something really fun.
The Circuit
Using the components in the wishlist linked to above, we’ll create some extra circuitry that our app can use. Feel free to use other sensors or outputs, but we’ll only be going through how to connect up the listed components.

Set up your bread board like so and note that the LED we’re using is an RGB common anode LED which means that to control the individual colours we’re using the cathode (negative wire) so to turn the LED on, we need to pull the pin low, not high. It might seem counter intuitive, but that’s how ‘active low’ technology works.
Also note that the button is shown to connect the pin to ground when press, you can change it to connect to 3.3V when pressed, either way is fine.
Creating the Blynk UI
Now that our circuit is setup and ready to go, we don’t have to reprogram the Photon because it’s already running the example Blynk firmware. Go back to the Blynk app and we’ll put some widgets in to control our circuit.
Let’s put in the following widgets:
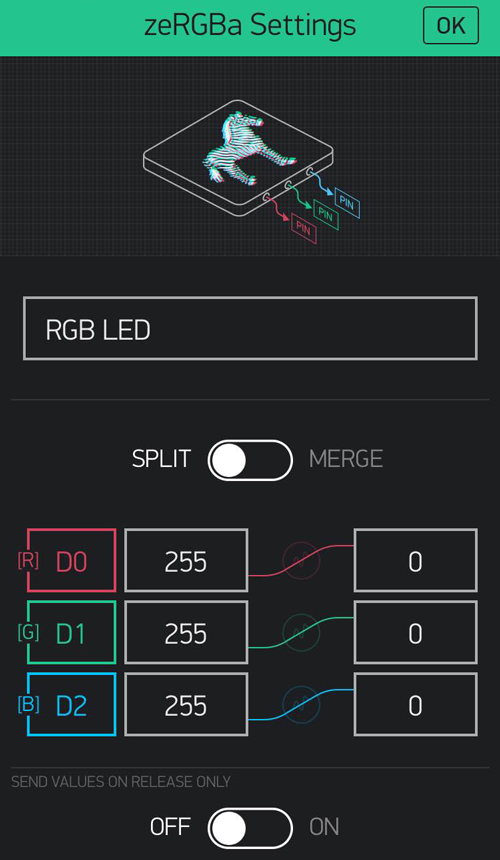
- zeRGBa. This will control our RGB LED
- Slider S. This will give PWM control over our vibration motor
- Graph. This will display the state of the button, and graph the pin state
To configure each widget, set it up as follows paying attention to the pins used as that will correspond to the circuit diagram above:

Once you’ve configured each widget, hit the play button and try it out. Did it work? Awesome! Go you!
What Now?
The best bit is that this is just start of the functionality that Blynk is capable of, and we’d love to see what creative projects you can make using Blynk and Particle, or any other platform for that matter. Head over to our projects section to share some of your creations, or use our forum for community and staff help if you get stuck.

