OctoPrint Integration is one of my favourite new features in Cura 2.6+: LulzBot Edition. In short, this integration means that you can print and control your 3D Printer via it's OctoPrint server. All from within your slicer window on your PC. The current path for this process is slicing your model and save that information as a .gcode file. Then using an SD Card (or some other way) you would upload that G-Code to your printer. Now, the process is as easy as Opening, Cura, Slicing a model, and Printing, all in the comfort of Cura 2.6 LulzBot Edition.
This tutorial will show you how to connect your OctoPrint server to Cura 2.6. If you follow along, you will have access and control of your 3D Printer from any computer with a local network connection to your OctoPi. We will only be covering computers on the same local network in this tutorial. If you want to have these options available over the internet, get in touch with us. It can be a risky process opening OctoPrint up to the wider internet.
All you really need to follow along with this tutorial is to have Set Up Remote 3D Printing for your Lulzbot 3D Printer and to have Installed and configured Cura 2.6 for your 3D Printer. Beyond that, your printer needs to be switched on, connected to your OctoPrint server and ready to go.
Get your API key
The process is quite simple, we need to get an API key from our OctoPrint server so that it can recognize our version of Cura as a legitimate user and give it access to all the OctoPrint features we need to use. To do that simply go to your OctoPrint home screen in your browser of choice and click on the Settings Gear in the menu bar at the top of the page.

Now find the subheading in the left-hand menu called API, and copy the API Key to your clipboard.

Connect your OctoPrint Server to your Printer in Cura
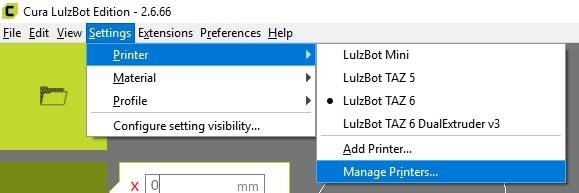
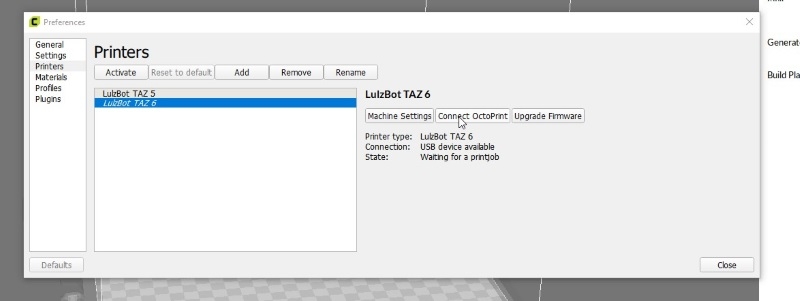
That's all we need OctoPrint's web interface, for now, go ahead and open Cura 2.6 and find your way to the Manage Printers dialogue box, select your printer and click on the Connect OctoPrint option on the right-hand side.
If you're running Windows 10, there's a chance the path to your printer won't automatically be listed on this screen. To be sure they are, you can simply install Bonjour Print Services and restart your machine to make sure the changes take effect. Now your OctoPrint Server should be listed as octoprint.local in the Connect to OctoPrint Dialog box in Cura.
Select your Print server from this list, and you will see an API Key text entry box appear, paste your API key from OctoPrint into this box, select the settings from the checkboxes underneath (enable your webcam if you want to view it in Cura) and continue.

Now, you should see that your printer is connected via the Manage Printers window. Exit out of that screen and you are ready to print with OctoPrint from Cura 2.6.

Printing to OctoPrint directly in Cura 2.6
Now that you've completed the obligatory 'handshake' between your version of Cura 2.6+ and the OctoPrint server, you can access your printer through the gateway you've set up in Cura. Essentially, follow a regular slicing process for an STL file (check out this guide if you need help with that side of things).
However, during the final step from the above tutorial (where you save your G-Code to your SD Card or Local computer), you're going to be selecting the option "Print with OctoPrint" instead.

The right-hand screen in Cura will swap over to the Printer Control Tab, and your print should start on the screen, right from inside Cura. You'll be able to monitor temperatures, time elapsed etc all from Cura. If you want, you can still simply click over to your OctoPrint server in the Web Interface and you'll see that your G-code file has been uploaded and the printer should already be starting up to print your Model files. Essentially, the step of saving G-Code to your PC then Uploading it to Cura has just been completely removed, awesome!
That's how easy it is to integrate OctoPrint to the new version of Cura 2 from LulzBot! If you have any questions about the procedure, don't hesitate to let us know in the comments below, as always, we're full-time maker's and here to help!

