By default, FFF/FDM 3D Printers require the 3D Models they print to grow up from the Print bed at an angle of 45 or more. This is by far the biggest limitation of all 3D Printers. To print models that don't follow that rule, and have parts hanging out at a greater angle, or are simply printed in mid air (i'm looking at the Chin of every bust I have ever wanted to print) require support material to successfully print. You can either design the model to use no supports (or have in-built supports), generate your support material in your slicer or edit the STL mesh and generate support materail prior to slicing. In this guide we will look at using mesh editing tools and your slicer to 3D print overhangs successfully.
I'm going to be using a model found online of a Elf Wizard as it requires supports and is quite small. I didn't create the model, however, you can find it in the downloads section below if you'd like it.
We can see if a model needs supports within our Slicer, as they are shown in Red when using the Model view. The main issue we face with support material is that it can be difficult to remove and leave marks on your model that make it look horrible.

We'll be using LulzBot 3D Printers, as well as their flavor of the popular open-source slicer, Cura. If you want to learn more about either of those things, please take a look at our other tutorials.
Slicer Supports
If you want to simply generate supports for a design and not have to delve to far into the matrix to do so, there's an inbuilt tool in slicing software. In Cura, it's a simple checkbox that you can select called "Generate Support", and it will generate support material for ALL overhangs in the print area. It's easy to do, and will generate support materails at a density of ~30%, with a gap of ~1 layer between the model and support material. This is usually easy enough to remove (maybe with some pliers and elbow grease) and doesn't leave the model looking too worse for wear. However, it's quite a massive waste of material, especially if you're utilising your printers whole print area.
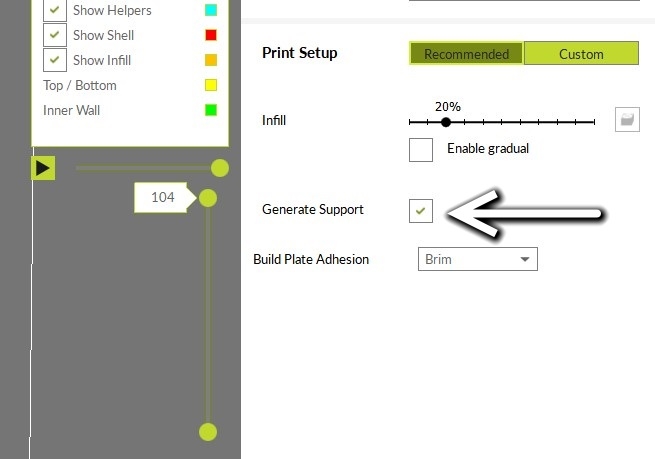

What do I mean by all? You can select whether you generate support material simply from the Print bed to the model, or alternatively, from everywhere to the model. Let's take a look at the difference
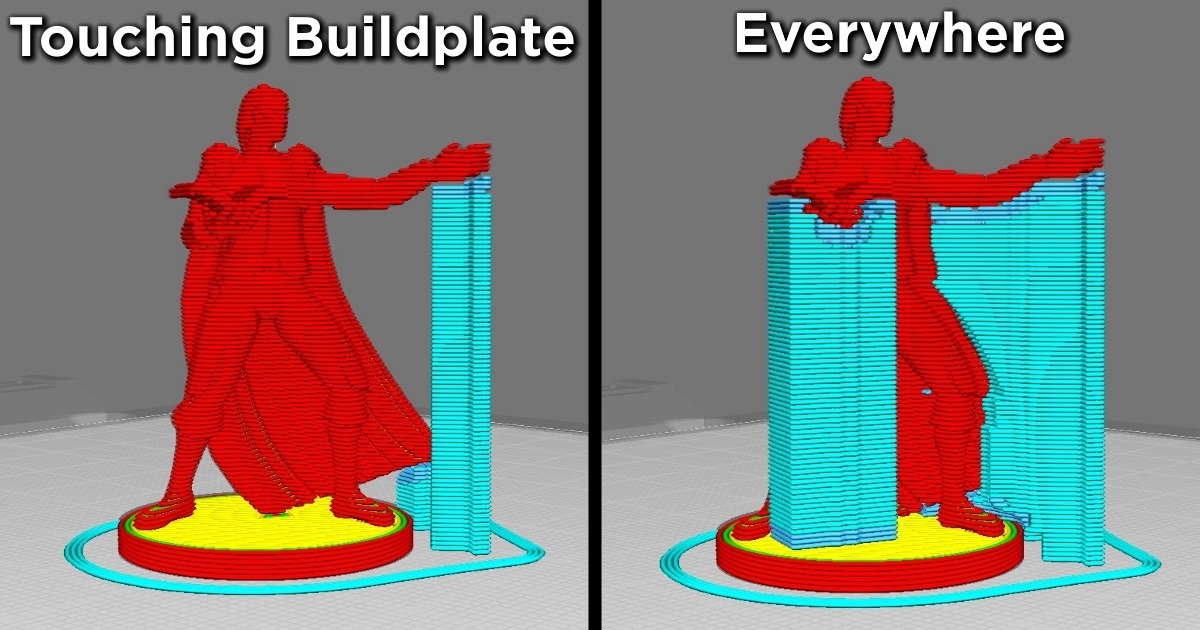
These supports typically breakaway relatively easily, however, as all overhangs are supported you can have material generated in parts of the model that aren't accessible with no way of removing them. The alternative method is to generate your supports separately using Mesh editing software. This software will open a STL or OBJ file and allow you to perform different functions to it to make it easier to print. Let's take a look at that process.
Meshmixer editing software
You can download Meshmixer for free from here and use it for free. It's a pretty powerful piece of software that allows you to easily edit and transform mesh files. Download and install it and open your model file.
This little guide is just going to be showing you how you can generate tree-style supports, rather than the lattice supports generated inside of our slicer, if you'd like to learn more about Meshmixer, we'd be happy to show you. Let us know in the forum and we can work on some tutorials.
Import your model into the workspace, and go to the analysis option in the toolbar.

Select the "Overhangs" option. This will analyse your model based on it's current position for any overhangs (the places where we want supports to be generated).

Once analysed, you will see some blue outlines with red shading on overhangs. We want to create some support material based on our printer setup.

Now we can tweak the settings visible to set some boundaries of where and how Meshmixer will generate supports. Take the time to set this up for your particular printer/nozzle to make it as good as possible. Once you're happy with it, select the Generate Support option (you can undo this easily, so go ahead and try/retry the process)

And now you can remove any of the tree supports, on their own, by control left clicking them. When you are happy with your model file go ahead and select the Convert to Solid button, and select replace existing (this will merge supports into your mesh). Alternatively, you could Create new, which will generate a second model within the OBJ file, that you could use on a second extruder. In any case, you're almost there!
Now simply export your model using the Export button on the far left toolbar! Save the model and open in in your slicer. Beware that your new model is likely a OBJ not an STL. and exporting models can take a while. I'd take the time to prepare your printer for printing (load filament, make coffee, etc).

That's the process! Now your model has tree style supports, which are less wasteful, easier to remove and look pretty cool. To remove the support material, simply pull it away from the model/snap it off. It's just as easy as that!


You don't require any special tools to remove the supports, they should break away fairly easily, however I'd recommend these Flat pliers from Hakko. They're easily my go to for getting tiny supports off my models. The supports were ALOT easier to remove, and I'm by no means an expert in this new Tree-style support generation.

It's going to make printing all these smaller models with the new Micro Aerostruder far more enjoyable. There's one new option that I'd like to quickly explore for supports.
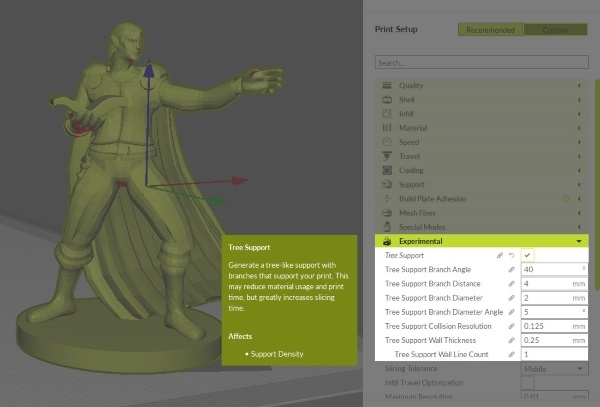
Experimental Tree Supports in Cura
As of Cura 3.2.27, there are tree supports under the experimental section within the Custom options in the Slicer. Let's take a look at them against the other methods. First off you'll need to enable visibility of the option. Simply click on one of the gear icons beside the setting headings, and select 'Check All' in the new window.

Now you can enable Tree Supports.
Have a play around with the settings, but be prepared to wait for the slicer to make it's way through each time. Using the default settings I get a model that looks pretty crazy, but printable.

These were even easier to remove than the Meshmixer trees and lattice supports, which is good to know. Although, there looks to be some retraction/stringing between the support and model that I'll need to work on. But that's for another tutorial!
Let us know in the comments if you need help/advice on following any of these instructions or if you have some suggestions for improving our Meshmixer settings, Cura settings or anything support/3D printing related. All the best with your projects!

