In November of 2017, our friends over at LulzBot released a major software update to their Slicing software, Cura. In this tutorial, we will look at what Cura is and does, the process of installing Cura 2 onto a PC already running Cura 21.xx, upgrading LulzBot 3D Printer firmware and finally take a quick look at the new User Interface in Cura 2 LulzBot Edition.
What is Cura?
If you're a beginner in the realm of 3D Printing, it's easy to become confused by the different software package names, acronyms and jargon. In this tutorial, we're simply looking at the most critical software package for your journey into FDM 3D Printing, your Slicer software. As we use LulzBot 3D printers, we will be looking exclusively at Cura 2 LulzBot Edition as our Slicing software (there are dozens of types of slicers, all with different names, supported printers, settings and user interfaces). Some printers exclusively use a certain Slicer software, and others just recommend them. Aleph Objects, the company that makes LulzBot 3D Printers, has created their very own flavour of the popular Cura Slicer and tailored the entire software package exclusively for their printers.

To understand what slicing software does, you need to understand the basic concept of 3D printing. Essentially, that is utilizing a machine to create a model in 3 dimensions (models with height, width and depth!). 3D models exist as files, like any other object on a computer. These 3D models can be designed and/or downloaded in a couple of different file formats. The most common file formats that we use for FDM 3D Printing are:
- STL files (.stl) - it stands for Standard Tessellation Language and simply refers to the language used to represent 3D Models on a computer screen.
- OBJ files (.obj) - a similar geometry definition file to STL.
We need our 3D Printer to be able to translate this 3D Model file (STL, OBJ etc) so it can reproduce it. To do that, we 'slice' the model down into a set of instructions for our 3D Printer to carry out and reproduce the model. Our printer responds to G-Code commands, which are simply a computer commands that tell all of the different moving parts of our 3D Printer to move in a specific way. For example, we can move a motor/axis of our printer a certain direction or push a certain amount of filament out of our extruder with G-Code commands.
So our Slicer software takes the 3D Model (STL/OBJ file) and turns it into a G-Code file that we can send to our printer so that our printer can replicate that model. We don't have to sit down and write out instructions for our printer, we just need to plug in a few important values, tell the printer what we want to print and how slow/fast and at what quality we want to make the model.
Like we said above, there are dozens of types of slicer packages for FDM 3D Printing, however, at their core they are all doing the exact same job. Turning 3D models to G-Code.
What is Cura 2.6 LulzBot Edition?
Since 2015, LulzBot 3D printers have been designed around a user experience on 'Cura 1' (it's actually Cura 15.04.6 from Ultimaker). However, in November of 2017, LulzBot released their major update to the older Cura 1 Slicer, called Cura 2 LE (LulzBot Edition). Essentially they've tailored the experience of Cura 2 to LulzBot 3D printers for LulzBot users!
The newer version features a new, flashy user interface, a new slicing engine, and tonnes more options on every front for users of all experience levels. We're going to be investigating the newest version of Cura 2 LulzBot Edition, including installing it right through to slicing models and printing them on your LulzBot 3D printer.
The installation process
The installation of Cura 2 LE is a little more in-depth compared to usual software packages, and realistically its only because you need to remove the local application settings of your older version of Cura to be able to print correctly with Cura 2. If you've never had a version of Cura installed on your PC, you can go right ahead and skip most of these steps. You simply need to download and install the software package from the following download link.
To download the relevant version of Cura 2 LE for your 3D printer, head over to LulzBot's Cura Downloads page, where you can see the 4 major OS downloads available. Here's a link for the lazy.
There's important information at the top of each of the download pages. To be 100% clear about it though, I'll relay it here in case you skip it there.
When you update your 3D Printer's firmware via Cura 2 LE, it will change the way your printer reads G-Code files from Cura Legacy Edition. This means that G-Code files sliced on 'Cura 1' will not print correctly on your newly flashed Printer. You will need to re-slice those model files to have working G-code for those models.
So go ahead and download the installer for your relevant OS. Below the download link, you will see some collapsible menus that walk you through the process of removing the Cache files of your old Cura installation. I recommend doing those steps in the following order:
- Uninstall your current version of Cura (Legacy Edition)
- Remove cached files from %appdata% and %localappdata% as outlined in the LulzBot Guide
- Install Cura 2.xx from the downloaded file
- Start Cura 2
Once you've installed Cura 2, you're ready to get started with slicing some 3D model files! When you first open up Cura 2 for the first time, you will be taken through a Printer Install wizard. Select your relevant printer and tool head during this part of the setup and select the 'Add Printer' button.

Now you will be met with a Machine Settings window, which will be filled out for your selected printer type. You can go ahead and click 'Finish'

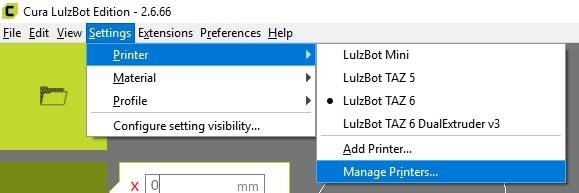
To be sure that your printer is running the latest firmware now is a great time to connect up to your PC via the USB cable provided with your printer. Once you're connected go to your Printer settings via the Setting drop-down box in the menus at the top of the screen. You want to go Settings > Printers > Manage Printers...
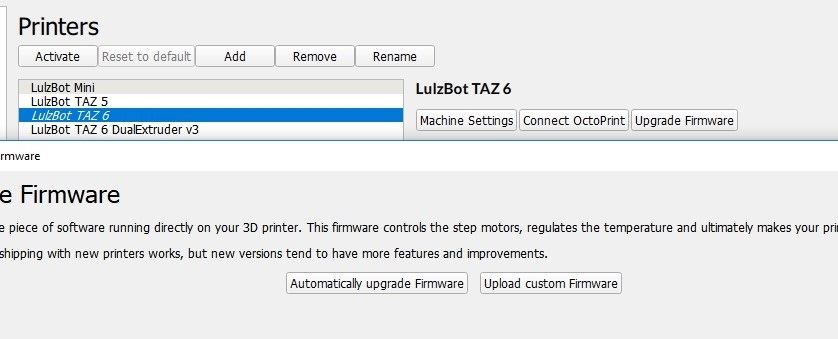
Once that window opens, click "Upgrade Firmware"
Now "Automatically Update Firmware" and wait for the firmware upgrade to complete.
That's it! You've set up Cura 2 to work correctly with your LulzBot 3D Printer.
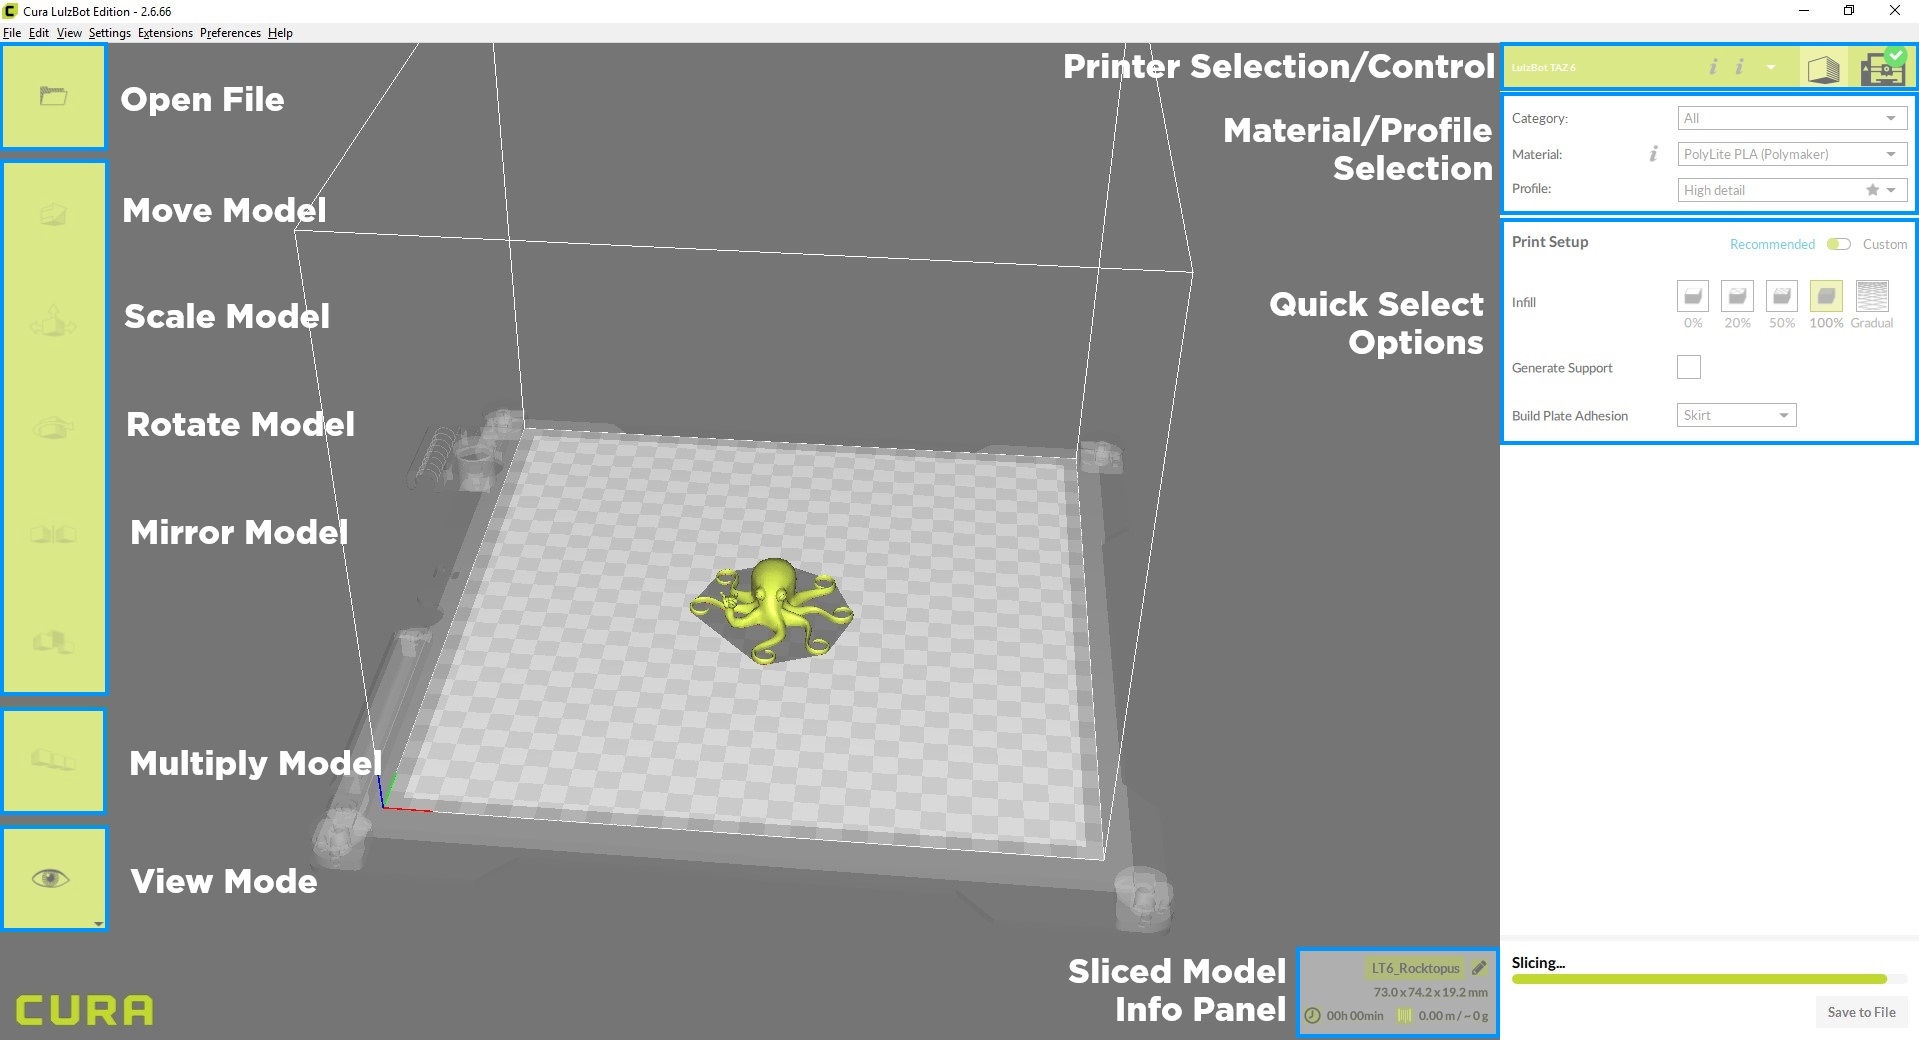
If you've used Slicer software before, it's probably a good idea to take some time to familiarize yourself with the layout of Cura 2. If you're a newbie, I've made this handy info sheet that labels all the different 'quick access' User interface options and what they are for. Remember that these settings are contextual to the model you've loaded onto the print bed.
In our next tutorial, we are going to dive into all of the options you can see here, what they mean and how you can navigate yourself around the workspace in Cura. Then, in the future, we will do an in-depth dive into all of the new slicer options that you can't see easily in Cura 2 LulzBot Edition. If you had any troubles with the processes outlined above, please don't hesitate to get in touch via our Forum (or simply start the discussion below!). I've had plenty of touch time with Cura 2 LE and can likely help you out.

