
Pimoroni Keybow MINI (3-key) Macro Pad Kit (Clicky)
In stock, ships same business day if ordered before 2PM
Delivered by Mon, 29th of Apr
Quantity Discounts:
- 6-12 $62.49 (exc GST)
- 12+ $60.54 (exc GST)
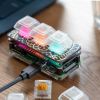
This kit has everything you need (just add a Raspberry Pi Zero WH and micro-SD card) to build your own mini macro pad. It comes with your choice of clicky (Gold) or linear (Silver) Kailh Speed switches, and clear DSA-profile key caps that look incredible when lit up with the per-key RGB lighting. The fancy hot-swap Kailh sockets mean that there's absolutely no soldering required!
Kit includes*
- Keybow MINI PCB
- Switchplate
- Three Kailh Speed switches (Gold or Silver)
- Three clear DSA-profile keycaps
- Acrylic baseplate
- Fixings and feet
- Micro-USB cable (50cm)
- Comes in a reusable mini kit box
*Just add a Raspberry Pi Zero WH and micro-SD card
It works great for media controls: map the keys to volume down / mute / volume up or previous track / play-pause / next track. You can use it as an osu! controller too. Or why not make some really complex multi-step macros to automate common tasks like opening a new email and pasting in some boilerplate text?
Keybow MINI works great with a Raspberry Pi Zero WH (with pre-soldered header), using the Zero's USB HID gadget mode so that it appears as a real keyboard when plugged into your computer with the included USB cable. Pimoroni has built a completely custom, stripped-down, RAM-disk-based Keybow OS with a Lua interface to customise the layout and lighting on your Keybow MINI. It's Windows, Mac, and Linux-compatible.
Keybow MINI features
- Per-key RGB LEDs (APA102)
- Kailh hot-swap switch sockets (for Cherry MX-compatible switches)
- 40-pin female header
- I2C and SPI breakout header for add-ons
- Custom Keybow OS
- Compatible with Raspberry Pi 3B+, 3, 2, B+, A+, Zero, and Zero W
- Assembled size: 68.5x31.75x39mm
Construction
The Keybow MINI PCB has a 40-pin female header, like a regular pHAT, that plugs onto the 40-pin male header on the Raspberry Pi Zero W. The Pi is attached to the acrylic baseplate, and the whole thing is rigidly held together by metal standoffs. Rubber feet on the baseplate stop Keybow MINI from slipping around on your desk.
Mechanical switches
Keybow MINI comes with your choice of Kailh Speed Gold (clicky) or Silver (linear, non-clicky) switches. Both switches are light and smooth, and the gold switches have a satisying click when pressed.
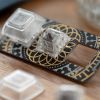
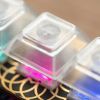
Pimoroni has chosen clear DSA key caps for Keybow MINI, as they show off the per-key RGB LEDs really well. The slightly frosted finish on the clear key caps diffuses the light beautifully. Being DSA, the caps have a flat profile that suits the small size of Keybow MINI.
The switches slot into the PCB switch plate to hold them securely, and then push into the Kailh hot-swap sockets on the Keybow MINI PCB. This means that there's no soldering required, and you can easily change out the switches in the future, if you wish.
Note that if you want to use different switches with Keybow MINI, then you'll need to ensure that they have a recess on the underside for surface-mount LEDs.
Lighting
Pimoroni has used the same tiny APA102 RGB LEDs that we use on our Picade Plasma PCBs, and there's one under each of the three keys. The LEDs sit in the cavity on the underside of the switch and shine up through, into the key cap.
There's a nifty way to light and animate the LEDs on Keybow MINI. You can create a PNG file with a coloured gradient or pattern, and it will be animated across the LEDs from the top of the image to the bottom. The width of the PNG determines how it's displayed.
You can manually set the LEDs on one or more keys, overriding the animation, or have them only light up when pressed.
There are a bunch of example animations to use, or you can create your own in your favorite graphics program.
Key mappings and layouts
The power of Keybow MINI is in how customizable it is. You can map each of the three keys to whichever keyboard keys you want, or even have them trigger a whole series of keypresses or strings of text to be entered.
Pimoroni's Keybow software uses the on-the-go micro-USB port on the Raspberry Pi Zero W and USB HID gadget mode, so that it appears as a regular USB keyboard device when plugged into a computer.
The custom, stripped-down OS runs on a RAM-disk, meaning that it boots and runs quickly, it's robust against being unplugged, and there's no risk of SD card corruption.
To customise your Keybow MINI layout and lighting, just pop the micro-SD card out and edit the keys.lua file on your computer.
Note that you'll need to add keybow.use_mini() to the setup function in your key layout file to remap the keys to Keybow MINI's smaller layout.
Exact shipping can be calculated on the view cart page (no login required).
Products that weigh more than 0.5 KG may cost more than what's shown (for example, test equipment, machines, >500mL liquids, etc).
We deliver Australia-wide with these options (depends on the final destination - you can get a quote on the view cart page):
- $3+ for Stamped Mail (typically 10+ business days, not tracked, only available on selected small items)
- $6+ for Standard Post (typically 6+ business days, tracked)
- $10+ for Express Post (typically 2+ business days, tracked)
- Pickup - Free! Only available to customers who live in the Newcastle region (must order online and only pickup after we email to notify you the order is ready). Orders placed after 2PM may not be ready until the following business day.
Non-metro addresses in WA, NT, SA & TAS can take 2+ days in addition to the above information.
Some batteries (such as LiPo) can't be shipped by Air. During checkout, Express Post and International Methods will not be an option if you have that type of battery in your shopping cart.
International Orders - the following rates are for New Zealand and will vary for other countries:
- $11+ for Pack and Track (3+ days, tracked)
- $16+ for Express International (2-5 days, tracked)
If you order lots of gear, the postage amount will increase based on the weight of your order.
Our physical address (here's a PDF which includes other key business details):
Unit 18, 132 Garden Grove Parade
Adamstown
NSW, 2289
Australia
Take a look at our customer service page if you have other questions such as "do we do purchase orders" (yes!) or "are prices GST inclusive" (yes they are!). We're here to help - get in touch with us to talk shop.
Have a product question? We're here to help!
Videos
View AllGuides

Raspberry Pi 5 Vs Raspberry Pi 4 Model B | Comparison & Benchmarking

Raspberry Pi 5 | Review, Performance & Benchmarks

Upgrade your Project for the Raspberry Pi 4
")
Raspberry Pi 4 vs Raspberry Pi 3 Plus (Model B)
Projects

safePower

ESP32 IR-Triggered Camera with Home Assistant Integration

LuMa 1 - The Neo Disco Ball
Educational Workshops

Raspberry Pi Workshop for Beginners

Makers love reviews as much as you do, please follow this link to review the products you have purchased.
Product Comments