For $50 and some dedication a retro gaming console can be yours and with HDMI you can play it with any modern TV or monitor. Instead of using bulky and space taking cartridges and discs it's all on the console.
For this build, we're going to use Retropie, an awesome software package that handles all your emulation needs with inbuilt Bluetooth and wireless needs.
Any Pi can run RetroPie, but I recommend using the Raspberry Pi Zero W as these will maximize space and be able to play all games up to but not including N64 but also has Bluetooth for all Bluetooth controllers.
Tools and Materials
- USB gamepad8bitdo NES30 Pro
- MicroSD card, 16GB
- Mini HDMI male to HDMI female cable
- 4-port USB mini hub
- Micro USB male to female extension cable
- Micro USB male to USB female cable
- Double sided tape
- Box cutter
- Raspberry Pi Zero W
- NES Cartridge
In this Project, we will be using the Raspberry Pi Zero W, Made by the Raspberry Pi Foundation. It is a tiny and affordable computer that you can buy here on Core electronics for $15.There's also the regular Pi zero, but it doesn't have the Bluetooth functionality although it is only $7 here on Core Electronics. They both work fine, but the regular Zero doesn't have the Bluetooth and Wireless capabilities
Adapters are a must when it comes to the Retropie W because the Raspberry Pi zero w gives up its full sized counterparts making you use adapters. The adapters aren't hard to find, and all the components you will need will be linked at the end of the project.
Don't destroy a classic game cartridge for your project, just use a remade cartridge so that the original game, although it may be bad, is intact. Retropie is a software that will run all our games and emulators for us. It's a full suite of Emulators that will run all of your Rom needs. Because the Raspberry Pi doesn't have inbuilt memory, it uses a micro SD card will be required to put Retropie on.
Installing Retropie
Download and unzip Retropie from here link
We will use the one for the Raspberry Pi Zero W
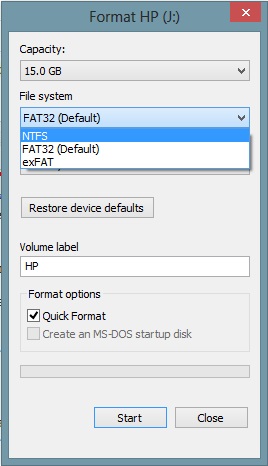
To begin with, we will format your micro SD card to FAT32.plug in the SD card in your SD card reader. Your SD card should now show up as mounted.
Mac
On Mac go to Applications > Utilities > Disk Utility. Highlight your SD card in the left pane. Now simply choose the Erase button, Select MS-DOS (FAT) as the Format, give it a nickname, and click the Erase button.
To install Retropie on Mac, we'll use a program called ApplePi-Baker. It's pretty much just Win32 for Mac. Download the most recent version here and open the application. ApplePi-Baker requires admin access to read/write to your SD card. You will be asked to enter your OSX account password and enter it, and you'll be okay.
Once the application recognise, select your SD card in the left-hand column and click the "Restore Backup" button. Select the now unzipped RetroPie SD-Card Image (.IMG file) that you previously downloaded.
If you see a message saying "'ApplePi-Baker.app' can't be opened because it is from an unidentified developer" when you open ApplePi-Baker, navigate to System Preferences > Security & Privacy and allow apps downloaded from anywhere.
Windows
If you're using Windows, then open file Explorer and locate the SD card. From there right click your SD card and go to the format option. From there select FAT32 and click start.
For windows, we will need a program called Win32. Download and Install it from here. Follow the instructions and select the unzipped RetroPie SD-Card Image (.IMG file) that you downloaded earlier. It will take about 10 - 20 mins to full write and then you can eject your SD card.
Connect the SD card to your raspberry pi along with your USB game controller, power and HDMI cable. Connect the other side of the HDMI cable to a TV. Plug in your power cord in last though or the Pi won't recognise the other peripherals. The Pi will boot
Starting the Cartridge Installation
In the cartridge, we need to remove the cross-supports because it doesn't leave room for our peripherals.

Using a Stanley knife, remove cross-support beams from both halves. To easily cut this out I just scored both sides of each cross support repetitively until it was flimsy and cut along the edges. I then pulled it out using a pair of pliers. The USB hub has an annoying plastic casing that is too big for the Pi so using a flat object pry it open and throw it away. Now that everything is in place Stick it down. Use the double sided tape to stick everything down. Route the cables around and close up the case.


Inserting Games
To add games onto your retropie turn off the system and plug in a USB. Turn the system back on with the USB in it and when it gets to the console selection screen unplug your USB and turn off your system. Plug that USB into your pc, and you will find that the raspberry pi has made a folder full of other folders. Import your roms to their respected folders on the USB. While the retropie is turned off plug the USB back in and all your games should be on theirs. If they aren't just rebooting the system and they should all be on now.
Setting up Bluetooth
Plug your wired controller back into the Pi because you will need it to setup your Bluetooth controller
you will need to update your controller's firmware by going to the respected website and updating it.
If you're using the 8bitdo NES30 pro, you can download the newest version here link.
The process is easy just follow the instructions on that page or look it up on youtube, to update your controller's firmware.
Turn your pie on and navigate to the Retropie screen
Open the Bluetooth device config Retropie screen, go to Configuration/Tools and select Bluetooth - Configure Bluetooth Devices.

Then turn the 8Bitdo hack selection off by choosing the 8Bitdo mapping hack option, so it says 8Bitdo mapping hack (OFF - new firmware).
Turn on your Bluetooth controller if you're using the NES30 pro hold down the left button on the bottom of the controller until the sides glow blue.
Once your controller is on, use your wired controller and select Register and Connect to Bluetooth Device. A "Searching..." box should appear and then a list of Bluetooth devices.

If your device doesn't show up then select Cancel and then try again once your controller is selected, select the DisplayYesNo security option. If the NES30pro is paired properly, the blue light will now be solid. Then you need to tell Emulation Station to recognize your new Bluetooth gamepad on system boot. on the same Bluetooth Setup menu, select Set up udev rule for Joypad and select your controller from this list. Then hit Cancel to exit Bluetooth Setup and RetroPie Configuration. Finally, reboot your Pi. While it's booting, you can unplug your wired controller and map your controller when it asks for it.

