So you've got your brand new RetroPie gaming kit setup, but you've got no idea how to save your games. No one wants to be starting afresh each and every time they jump onto their Pi for some light gaming. I've put together this handy guide that will show you how to use the internal save feature (similar to using a consoles onboard storage to save games) as well as how to save your game using RetroPi's save states function. We'll even take a look at the filesystem of the RetroPi OS using SSH/FTP from a Windows PC, and we demonstrate how to change a few settings to make your life easier when playing games on the Pi.
Retro Pi is an operating system designed for the Pi that uses the Retro Arch front end of the libretro API to emulate a compilation of gaming consoles, and they are all managed the same way internally via retro arch. Indirectly, this that we can use a particular emulator as an example and the information you learn will apply to all the different emulators on your system!
The normal save game function is similar to what you would have expected on any games console. When you hit milestones inside the game, you are prompted to save your game to the console's storage device. When you restart the game, you can load up your progress from that point. Most of the emulators have this feature, and you don't need to do anything special to be able to utilize it! All you'll have to do is hit the save point (which is different from different games), and your Pi will write a save game data file to the Emulator's directory (in the file system). More on the particular directory later, though, let us veer into save state functions!
The save state feature in emulators is a juiced up save game feature. Instead of hitting a particular milestone within the game, you can pinpoint the exact frame/point of time you're at, then save that referenced point to the Pi's storage. It's much better and faster than relying on often vastly spaced milestones for saving your game. To manage the save states, RetroArch generates a table of numbered slots. These slots correlate to each unique save state you create for each emulator. There's no practical limit to how many of these you can create either. Be very mindful of which save-state you select, though, by default it will be slot #0 and if you overwrite a save state you cannot undo it!
The most important stuff first: Keybinds!
In order to manage your slots/save/load features of the state feature, you'll need to become familiar with a using a couple of button-combos on your Pi controller. If you're using an 8BitDo SNES Controller (in fact, any controller will work using these mapped keys), by default, Retro-Arch will have set these hotkey combos as the following:
- Select + DPad Left = Decrease Save State Slot #
- Select + DPad Right = Increase Save State Slot #
- Select + Left Shoulder = Load from Current Save Slot
- Select + Right Shoulder = Save to Current Save Slot

You'll notice that each hotkey is a combination of the select button alongside another button. When you press the hotkey, you will get a line of yellow text in the bottom left-hand corner of your screen that will display some relevant text for the function you entered. If you want to change these default hotkey combinations, we will show you where that configuration file is later on.
And Status Messages!
So you can see that save states are handy as all get out, but they can be a little bit worrying, especially if you lose a hard earned save game file due to mindless saving overwrites. We'd recommend you use a combination of each of the methods outlined above to ensure that you get a reliable save game file.

Let's delve under the hood with your Pi and take a look at the default location for save games, the Controller configuration files and finally see how we can change these files without bricking your setup! There are a couple of applications you can use to see and change files on your Pi. If you're a whiz with Linux terminals, you'll probably opt to BASH your way through the file system with a keyboard attached directly to your Pi. In a regular human's case, it will be more worthwhile to see the file structure of your Pi in a standard Windows Explorer GUI. Go ahead and download the following two programs (mainly cause they are handy and excellent, but we'll also be using them to do stuff with the Pi):
We'll use the SFTP in FileZilla to access and change files in your Pi's file system! You don't have to do any of the changes, but in any case taking a peek never hurt anybody. To simplify the acronyms before they run away with us, SSH (Secure Shell) is a means by which we can access the Shell of a computer remotely (and securely); the shell is a user interface that allows us to directly communicate with the core of an operating system and it's services. SFTP is a secure (uses local user credentials) file transfer protocol built on SSH that we can use to access and change our Pi data!
If you're really interested...SSH and editing retropi.config
There are a few steps we will need to take to get to this point. First, you'll have to run a raspi-config within RetroPie (Go to the RetroPie emulator page on the home screen and run it from there).
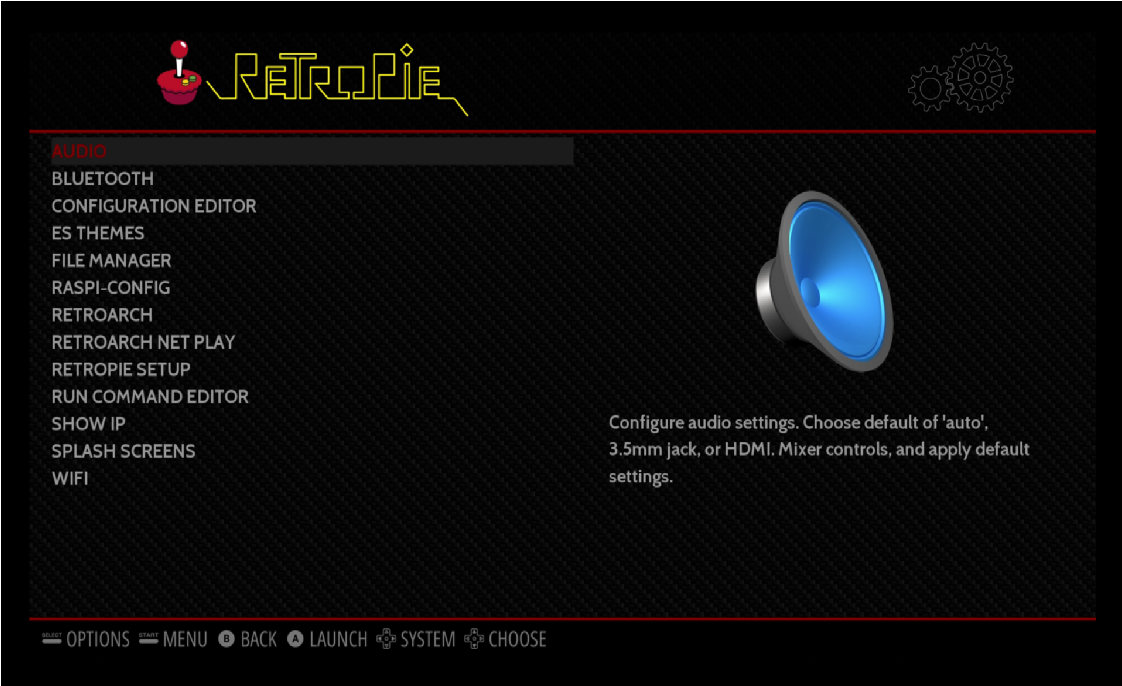
Select: raspi-config > Advanced Options > SSH > Enable
Next you'll need to know your IP address on your local network to ensure you can connect to your Pi, meaning they will both need to be on the same network! Luckily we can do this via the RetroPie emulator screen too!
Select the Show IP option in the Menu and look for your IP in the data stream that comes in.
Note the IP address of your Pi and head to your Windows PC; we will use FileZilla to connect to our Pi via SFTP.
Open up Filezilla and enter your Pi's IP address, then the login details for the Pi user. By default that:
Username: pi
Password: raspberry
IP Address of Pi
Port 22
For SFTP communication we will be using port 22. With all those fields entered, go ahead and click quick connect. You'll get a message pop-up when the connection is active. Congratulations, you've just logged into your Pi remotely!
 Next, we are going to navigate through the menu system to the appropriate places; your Pi folder structure is on the right-hand side of the Filezilla menu. You can also type the directory directly into the text field at the top of the window.
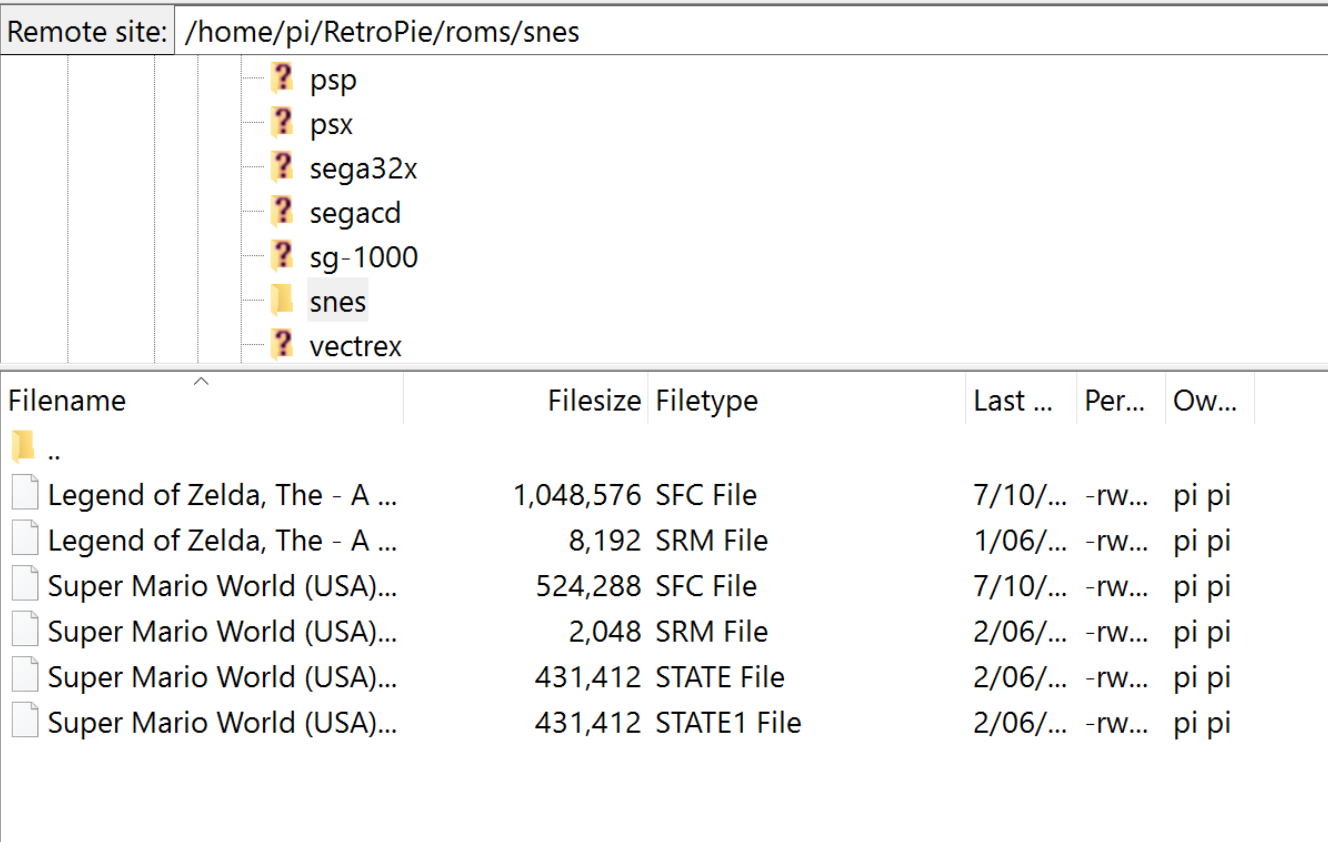
To find your save games and states, we navigate to the particular emulator you are using for the game you've been playing, in the case of the SNES that will be:
/home/pi/RetroPie/roms/SNES/
Once you are in this folder you will see a collection of different file types, one for the save states (.STATE) and one for the save game files (.SRM). The good news is that you can move these files to other systems running the same game/emulator and you'll be able to kick right off from where you were! Every emulator will hold their save states in a separate directory which you can now navigate around through the FileZilla menu system; you can copy these from the Pi to your Windows computer using the right-click menu with the save states selected too!
The next thing we want to be able to change is the save game locations, in case you wanted to save to a particular location or even to a USB drive. This information is all setup in your RetroArch.cfg file, and you can edit it through FileZilla. Remember how we told you to grab NotePad++? We are going to setup FileZilla to use that for text editing now; it will make the next section a whole lot easier! In Filezilla, go to Edit > Settings > File Editing > File Associations and paste the following into the white text box, deleting the notepad line that might already be there. Also, make sure you change the directory that this code is pointing to if you haven't installed it in a default location.
txt "C:\Program Files\Notepad++\notepad++.exe"
 Now when we choose to edit a file, we can use the cushy environment of NotePad++ to do so. Navigate your way to
/opt/retropie/configs/all/
Right-click the retroarch.cfg file and select edit file. Now you will see pages and pages of code; some commented out and some not. We are looking for the save game lines of code; you can use the find option to get here faster searching for 'save'
Navigate to the default save game option; change where we are saving our games to:
# Save all save files (*.srm) to this directory. This includes related files like .bsv, .rtc, .psrm, etc ...
# This will be overridden by explicit command line options.
# savefile_directory =
# Save all save states (*.state) to this directory.
# This will be overridden by explicit command line options.
# savestate_directory =
If you want to use these options, you'll just have to remove the # from the beginning of the line save state or save file and put a directory in after the equal sign. It's as easy as that.
There's a ton of options in the global retroarch.cfg file (the one we see above) and alternatively there's also a local emulator version of retroarch.cfg, but it's in a different location and only provides the same settings but specific for each emulator.
That has just about covered the different things you can do with save states, save games and loading game states on the RetroPi. We hope this tutorial has been particularly enlightening and it might even prevent you from losing some hard earned progress on your next Legend of Zelda bout. Thanks for taking the time to read our tutorial and let us know how you went with it in the comments below!

