Part of the joy that is Raspberry Pi is getting stuck into it at a slightly lower level and finding out exactly what you can do with it if you take a look under the hood. One of the most popular experiments to do with your Raspberry Pi is overclocking it. Overclocking is fairly simple to do on the Raspberry Pi, however, it requires additional cooling in the form of heatsinks and fans to ensure that the Pi doesn't overheat and damage itself. You may also find that your Pi gets hot under heavy usage, and it can be a good idea to cool it down, especially when using intensive processes such as the N64 emulator for RetroPie.
We've broken up the topics of cooling, stress testing, and overclocking your Raspberry Pi into individual tutorials to make it easier to digest. This is the third tutorial of the three: overclocking.
After much research on the internet regarding this topic, it was clear that there was no definitive guide with all of the information in one place, so we hope to answer all of your questions, however, if you want to know more, don't hesitate to get the conversation started in the comments below.
In the previous two topics Stress Testing Your Raspberry Pi and Cooling Your Raspberry Pi, we looked at different methods for cooling your Raspberry Pi using fans, heat sinks and other devices, along with how to stress test your Raspberry Pi under load to ensure that it's stable and your cooling is effective. We highly recommend that you read those two tutorials before continuing on with overclocking as you need to ensure that your Pi has adequate cooling for overclocking otherwise you'll risk damaging your board. You'll also need to know how to stress test it to ensure that your overclock settings are stable. Anyway, now we're getting to the fun part.
What is Overclocking?

Technically speaking, overclocking is simply increasing the clock speed of a processor. A computer is able to perform an amount of instructions per second which is represented in the unit for frequency: Hertz (Hz). This speed is known as the clock speed, and by increasing that speed (in the GHz range for modern computers), you can increase the number of instructions it can process per second, making it faster. However, nowadays, overclocking doesn't just apply to the CPU but is often used to describe altering the base performance in some way. For example, with the Raspberry Pi not only can you increase the CPU frequency, but you can overclock the SDRAM bus, the GPU, microSD card reader. You can also adjust the CPU voltage to allow it to handle the extra grunt, adjust the memory allocation across the CPU and GPU, and change temperature limits. There's more to overclocking than just CPU speed.
This tutorial will mostly be about overclocking the Pi 3. You can overclock all versions of the Raspberry Pi, and it was actually easier to do so on earlier iterations as the overclock settings were accessible directly through the Raspi-config menu. You can still follow the same steps to overclock earlier version, however, the specification references won't be the same.
It's important to note that whilst overclocking by itself won't damage your board at all, there are some configurations which, if set, will void your warranty. Do so at your own risk.
How to Overclock Your Pi
Before we start, know that the Pi 3 is a precisely tuned device. The Broadcom SoC is already running fairly high so there isn't a huge amount that can be squeezed out of it. Overclocking the Pi 3 is a bit of pot luck, some boards will overclock better than others. I tested 3 different Pi boards under the same conditions. I could get one running at 1.4GHz that was nice and stable, whereas the other two would only go to 1.35GHz before it hit stability issues during the stress testing. Still, a 200MHz gain is fairly respectable, especially off a base clock speed of 1.2GHz. If you can get a stable build using the stability tests we showed you in the Stress Testing Your Raspberry Pi, we'd love to see the results (pics or it didn't happen).
I repeat, you overclock at your own risk.
Now, let's get started. Below we've put together a list of the main options you can tweak on your Raspberry Pi. The key to overclocking is the config.txt file located at /boot/config.txt. All of the overclock options are edited in there, and the beauty of it is that you can swap the microSD card out to test different boards.
- arm_freq: Speed of the CPU in MHz
- gpu_freq: Speed of the GPU processor in MHz.
- sdram_freq: Speed of the SDRAM in MHz.
- over_voltage: Supply voltage to the CPU and GPU. When clocking to higher speed you will need to increase the value to ensure stability. force_turbo=1 must be set to allow values of 7 or 8, which voids your warranty.
- force_turbo: Disables dynamic clock speed, forcing CPU to clock at the max frequency. Voids your warranty.
- temp_limit: Overheat protection. Sets clocks and voltages to default when the SoC reaches this Celsius value. Setting this higher than the 85C default voids the warranty.
- gpu_mem: Sets the GPU memory allocation in MB. This determines how much memory the GPU can access, and the rest is given to the CPU.
To adjust these open up a new terminal window and open up the config.txt file by entering the following:
sudo nano /boot/config.txt
Make the changes to your overclock settings (adding new lines in where necessary), and press Ctrl+X, Y, then Enter to save the changes. In order for the changes to take place, you will need to restart your Raspberry Pi using the following command:
sudo reboot
Now that you know what you can fiddle with, the best way forward is to start with the arm_freq. Get this to as high as possible whilst still being stable and running cool, then focus on each setting you want to change. For example, if you want to juice up your Raspberry Pi for a RetroPie gaming setup, then you would want to get the core_freq as high as possibly, and also give the GPU some more memory (gpu_mem=256 for example). The settings that will work best for you depend on your application. But whatever you do, we can't stress enough that it's important to use a high-quality 5V power supply with plenty of current on tap. We highly recommend the official Raspberry Pi power supply which can deliver 2.5 Amps at 5V.
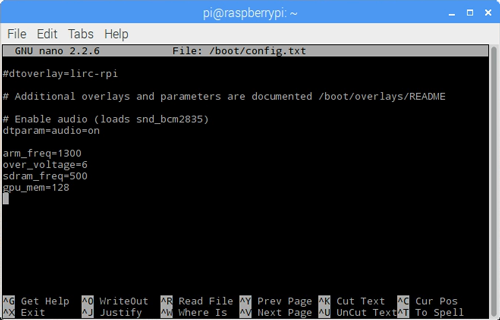
As we mentioned before, the ideal settings will depend on your application and may vary from board to board. However here are some example settings which worked well for us to give a general performance boost and should be stable on most Pi boards:
arm_freq=1300
over_voltage=6
sdram_freq=500
gpu_mem=128
They are just some example settings which will give you a good performance boost across the board without requiring ridiculous cooling. The best way forward is to experiment with different settings and find out for yourself though. Always remember to stress test after you change a setting to ensure cool operation and stability, and not to change multiple settings before you test, change one, test, repeat. Which brings us to an important point: stress testing.
Whether or not you went and read the previous two tutorials in the series on cooling, stress testing, and overclocking, just because you can boot your Pi using a setting, doesn't mean it will run stably. You need to at least ensure that it can survive the Stress test for 10mins before you should run applications such as server processes on it. All of the details on how to stress test your Pi and to ensure a stable build can be found on the Stress Testing Your Raspberry Pi tutorial. Just remember that if your current settings cause your Pi to lock up, or not even boot correctly, you can always put the SD card into a card reader on your computer and change the config.txt settings there.
And that's about all there is to it really, the rest is trial and error, and personal discovery. We'd love to see what you guys are getting up to with your Raspberry Pi, so let us know in the comments below, and stay tuned for an article specifically on tweaking the Pi performance for RetroPie.

