Toolheads for your 3D printer come in all shapes and sizes. The different models available from Lulzbot are all designed with a specific purpose in mind, usually to add a filament type to your 3D printing repertoire. Dual extruders enable you to print with 2 filaments simultaneously, the flexystruder allows you to print flexible, softer filaments. There's even the Flexydually extruder tool head, allowing you to print one soft and one rigid filament type. But what if you just wanted to print more? Like bigger models, much faster than you are used to? Well, Lulzbot answers that question with their newest tool head, the MOARstruder. We're going to take a look at the setup process and share our first impressions of the tool head with you.
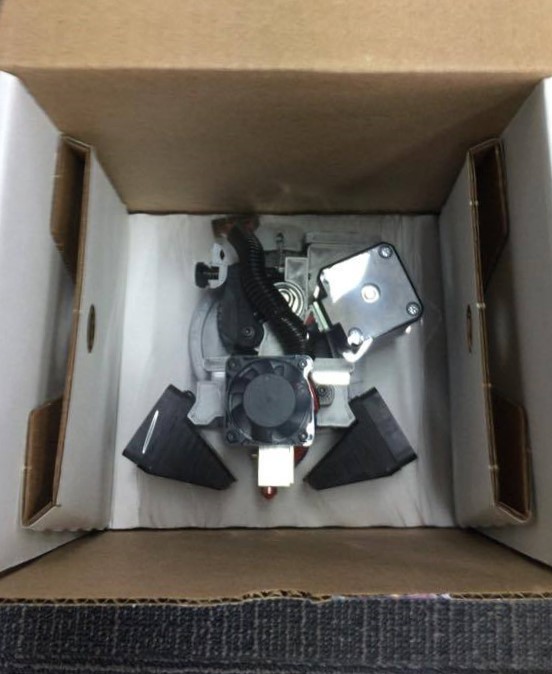
Unboxing the beast
The tool head comes packaged in a cardboard box, with a beautiful, colourful sleeve around it. After a couple of strategically placed stickers, we can open the box and see a smaller box with a few accessories and the tool head wrapped in place at the base of the box. There's a few instructional cards, a glue stick, a few meters of some transparent-glase filament, a long bolt, and the tool head in the box.
To install your MOARstruder to your Lulzbot Taz 6 you will need a 2.5mm Hex Key and a PC with the latest version of Cura installed. As there is a firmware update with the MOARstruder tool head change, you must have the latest version of Cura or you simply won't be able to add the tool head to your printer!
The installation process is very straightforward. Write down the e-steps/mm written on the back of your tool head and head over to the Open Hardware Assembly Instructions provided by Lulzbot at https://ohai.lulzbot.com/project/lulzbot-taz-moarstruder-tool-head-v2-taz-6/
The process requires you to:
- Turn off your Printer
- Remove your existing tool-head
- Install the new tool head using the included bolt
- Connect your printer to Cura using the USB cable that comes with your printer
- Turn on your printer
- Change the tool head in Cura > Machine Settings
- Update the firmware
- Enter the E-steps/mm value into your 3D printer using the front panel controls.
Once you have done the setup for your tool head you are essentially ready to print. As is the tradition with Lulzbot, you are given the STL of a file to print to ensure your printer is working to a standard. For the MOARStruder this is a single-walled Vase that you print using the included T-glase filament! All you need to do is select T-glase from the Quick-print profiles (selecting spiral vase as the particular profile) and you are off to the races! As a sliced model, it took our Taz 46 minutes to print the model, which is quite good for an 115mm tall model.
The sample print uses a layer height of 1.2mm alongside the expert option we haven't seen before, Spiralize the Outer Contour. The tooltip inside of the Expert Settings defines that option as contouring the outer wall of your print, giving you a single walled print with a solid bottom layer. Sounds perfect for a vase! This is how our vase printed, satisfyingly so on the very first print of the tool head.
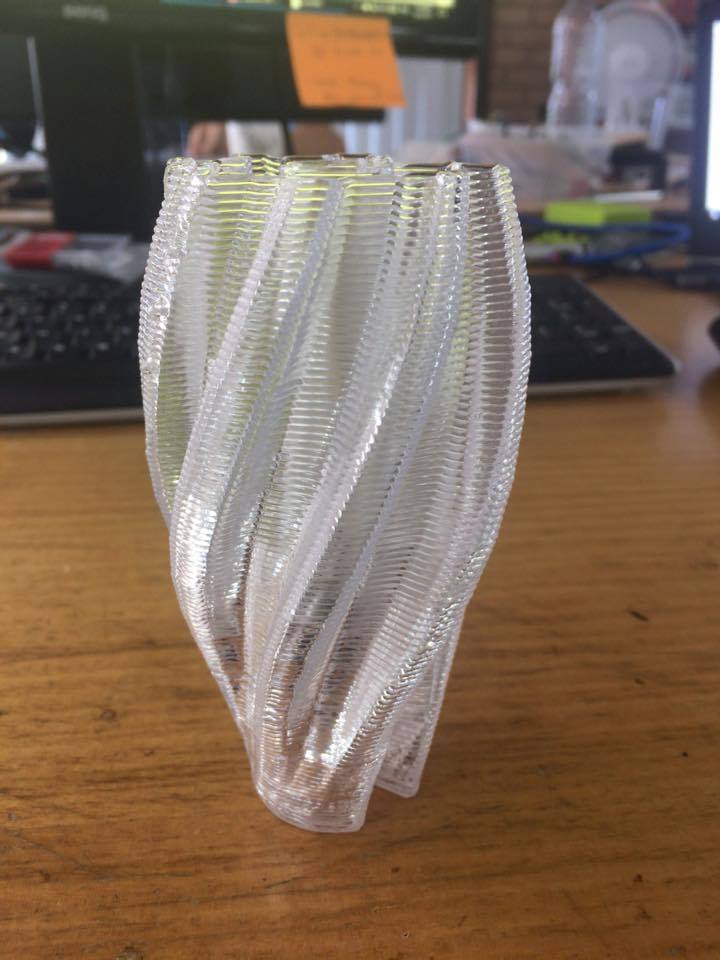
It is particularly impressive to see the transparency effect with the t-glase filament, the larger layer heights really made a difference in the prints!
Unsupported Overhangs with the MOARstruder
My first question after printing the sample print was, can I just print a tonne of single-walled prints now? Is it that easy? Did the larger, chunkier layer heights make it so? My head said no, probably not. But why not try it out?
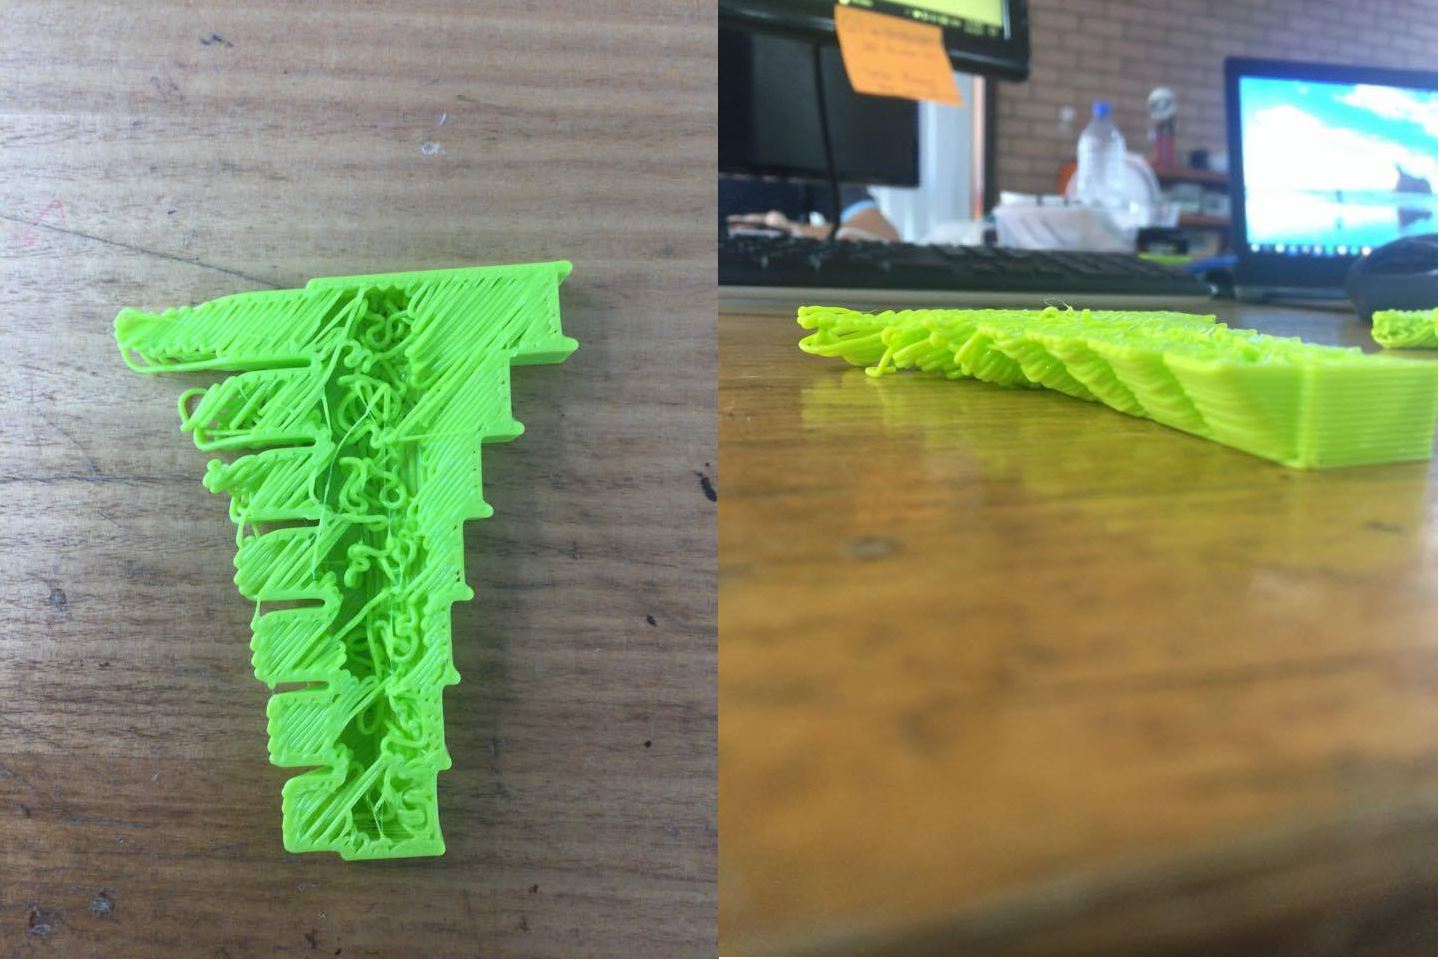
Well, to test my first question, I did what any respecting Lulzbot Printer owner would, and tried to print the larger Rock2pus.STL file using some Lulzbot Green PolyLite PLA. Before you scroll down and see, be aware that this print was done to simply test the single walled print questions I (and no doubt, other people) have.

You can see it didn't go particularly well, it was entirely my fault, though, the Moarstruder performed well. The initial outlines and first 5-6 layers printed really nicely but once there was any reliance on the infill, the extrusions did not adhere well to the print. As the layer heights were set to 0.9mm, it didn't allow gradual increases in Z-height to be reflected in the print successfully.
The extrusions with the MOARstruder are so chunky that the weight of the extrusion seems to have a negative effect on overhangs. Curious about that, I decided to print an overhang support test, scaled by a factor of 2 using the same settings as the rocktopus. I ended up printing 4 versions of the support test which you can see below. To summarise their differences (image below):
- The first print (top) was at 0.9mm layer heights using supports. This was to give a standard to compare against.
- The next print (bottom-left) was a single walled test, this is kind of the ultimate overhang test as there aren't any infill layers to rely upon
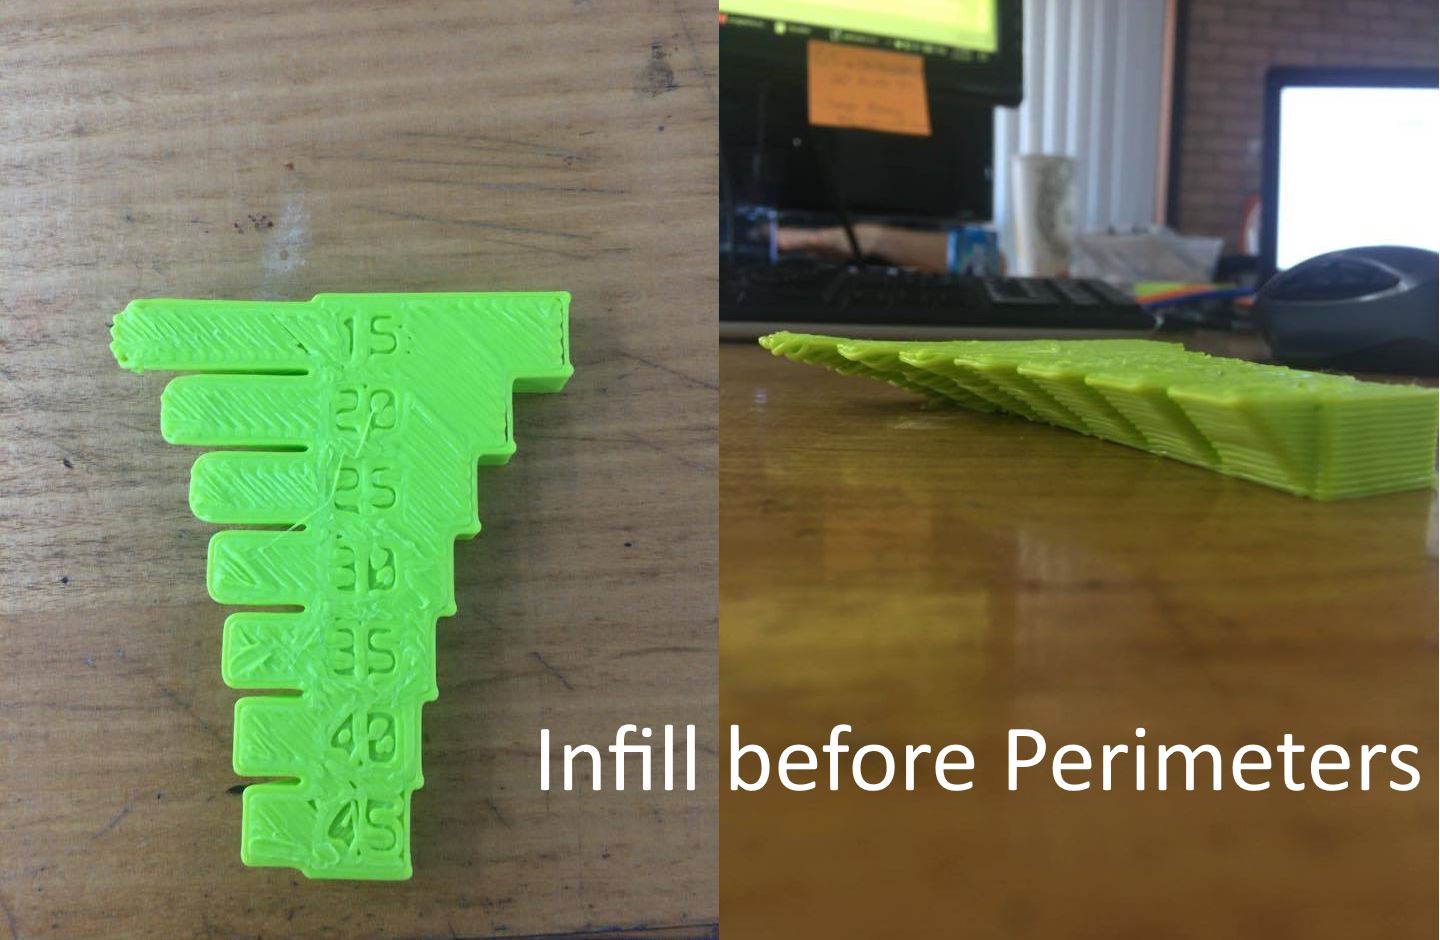
- This print (bottom-middle) was a print with 20% infill. The infil here was printed after the perimeter layers
- This print (bottom-right) was a print with 20% infill, however, the infill here was printed BEFORE the perimeter layers
Let's take a look at each of the prints.

The test file I was using tested unsupported and supported overhangs at angles ranging from 45 to 15 degrees in increments of 5 degrees. I decided to use the standard profile for the PolyLite PLA for these prints (it uses a 0.9mm layer height).
This is the test STL printed without any infill % and using the same filament (and layer heights) as the Rock2Pus was printed with. Before I comment, It seems a little simplified but a back of the envelope calculation I made was that I should be able to print any unsupported overhangs at angles greater than 36 degrees without any issue. If you want to know where I got that number my answer would be some basic trigonometry and hope. You can see that the two overhangs at 45 and 40 degrees printed fine, with the print failing at 35 degrees, the greater overhang was just a little bit too much to handle. Interestingly, the supported overhangs printed more than fine all the way down to 15 degrees!
This is the second & third test prints. They were printed at the same settings as above except I added in an infill % to see if it helped hold unsupported overhangs off the print surface. However, I printed the first one with Perimeters before Infill and it didn't help me out at all! None of the unsupported overhangs printed at a quality I would have liked with these settings selected. So I went ahead and printed the same model with Perimeters set to be printed AFTER the infill was printed. The results were much better, and I'd recommend this setting in particular for anyone printing overhangs with the Moarstruder. My initial calculation of 36 degrees for unsupported overhangs was accurate enough, as it seemed from my test prints that quality degraded after that point.

So with larger layer heights, you can afford to print using unsupported overhangs of around 36-37 degrees and supported overhangs down to 15 degrees! If you take my advice, and print with perimeters first using the MOAR, you will be able to print down to 30 degrees without supports pretty satisfyingly. This is of course subject to change with different filaments/printers and so on, but the process was enjoyable and informative for me! As a side note, the PolyLite PLA prints had a beautiful surface finish and printed the larger layer heights really well.
Speed considerations
The next question I had was just how fast, compared with a 0.5mm Nozzle on a Standard Tool Head, would I be able to print a model. I have a Taz 5 with a normal, stock standard 0.5mm Nozzle and the Taz 6 with the MOARstruder, so I did a bit of a 'slice-off' and noted the differences. I sliced a standard Rock2pus model, sliced at standard settings with PolyLite PLA.
On the TAZ 5 Printer, I was looking at a total print time of 2 hours and 48 Minutes.
For a Standard PLA print using the Moar tool head, I was looking at a total print time of 40 minutes.
This is where the quality vs speed debate weighs in. The MOAR tool head would produce my print faster, by using a larger layer height than normal, whereas the TAZ 5 would produce the same model, with smaller layer heights to give a better-looking finished model.
Overall impressions
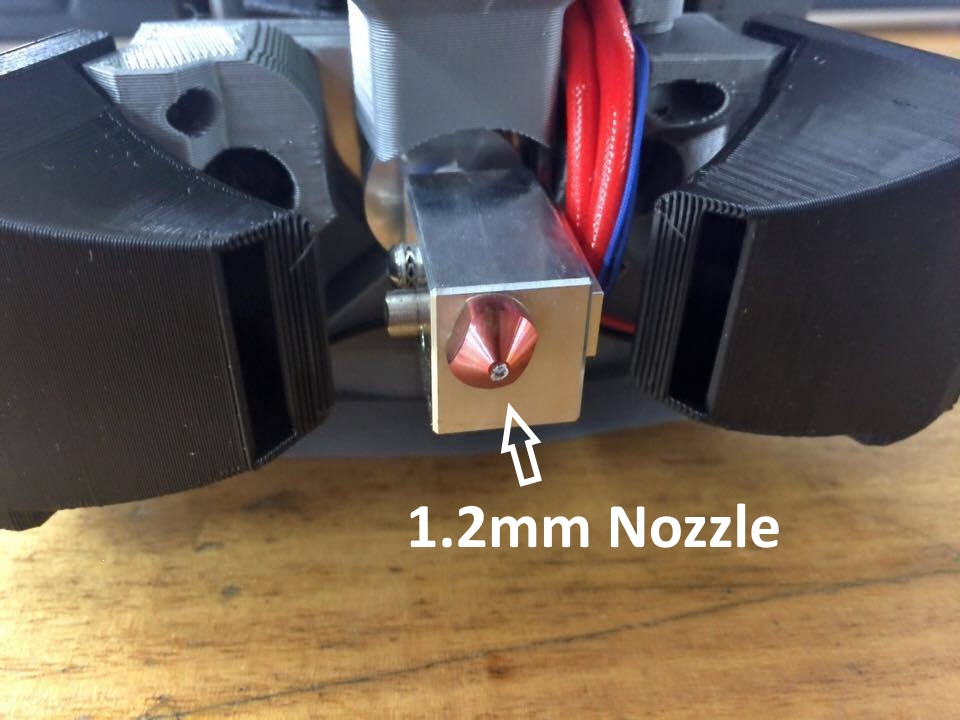
For finer, more detailed prints like 3D Model of small parts, the finer details are critical. The Moarstruder is limited to a 0.3mm Layer height. 0.3mm isn't too bad, but the 1.2mm nozzle makes thinner layer widths impossible, cutting into the overall quality of a print. If I was printing parts where the overall surface quality didn't matter too much, I just wanted strong, big parts. The MOARStruder is going to win every time. But if I am looking to recreate the gazillion polygon Deadpool Bust, as a photo finish model, I would probably opt to use the trusty 0.5mm nozzle on the single extruder tool head.
All in all, Lulzbot have done a fantastic job at creating a tool head that allows you to print more material, much faster than usual. It's not often you see a printer company go bigger on their tool head designs, but there is definitely a place in my heart for this one. It's going to get a lot of use in all of our larger volume 3D prints, not to mention any transparent prints we tackle! Like I said, though, if I am needing the details in smaller models, the 0.5mm nozzle will be my go to tool head.
Additionally, if you are wishing to print larger objects with infill %'s using the MOARstruder, it would really help you to deselect the Perimeters before Infill option in your Slicer. It will ensure your chunky, spaghetti-like layers have something to adhere to, particularly with overhangs.
If you have any questions or comments, feel free to get in touch with us. As always, we're here to help!

