Infrared (IR) is a great way of using non-visible light to control electronics, and there are a bunch of modules that we can use with our Arduino. However, what do we mean when we are talking about infrared and electronics? Well, IR remotes that control your TV and other appliances are the uses that immediately come to mind. They send packets of data, encoded using IR light, between the emitter (the remote control) and the receiver (the appliance). The controller inside the device decodes the signal and enacts the command that is related to the packet sent. The idea is great! Especially when you think of the alternative.
As you can gather, the bare necessities of an IR system are the emitter and receiver modules, to transmit a signal and receive the signal. The IR sensors that we see usually come in a pair that operates (send and receive) on the same bandwidth of the EM spectrum (given in nanometers, nm). Selling them in tandem is great, however, if you were chopping and changing parts out, bandwidth is the specification used to match your two components.
How are we going to use Infrared?
The obvious use for this sort of technology is the remote control, but infrared is part of a ton of cool applications. Wanting to give your robot ‘eyes’ to avoid obstacles and know when it is near a wall? Infrared is a viable option. If you wanted to create a motion sensor that can trigger an action when movement is detected, you could most definitely use IR. Even night-vision cameras and thermal imaging use infrared technology. There is a multitude of applications for the infrared technology, and maker-friendly products that utilize it are widespread and well documented too!
We are going to make a simple break beam circuit. Our friends over at Adafruit have made a wonderful pair of modules that are made for this use. Think of the burglary scenes in action movies, the protagonist carefully maneuvering through the maze of green laser alarms. We are going to make one of those but without the green laser part. Wait a minute; you are a maker! If you are super keen on one feel free to add it in!
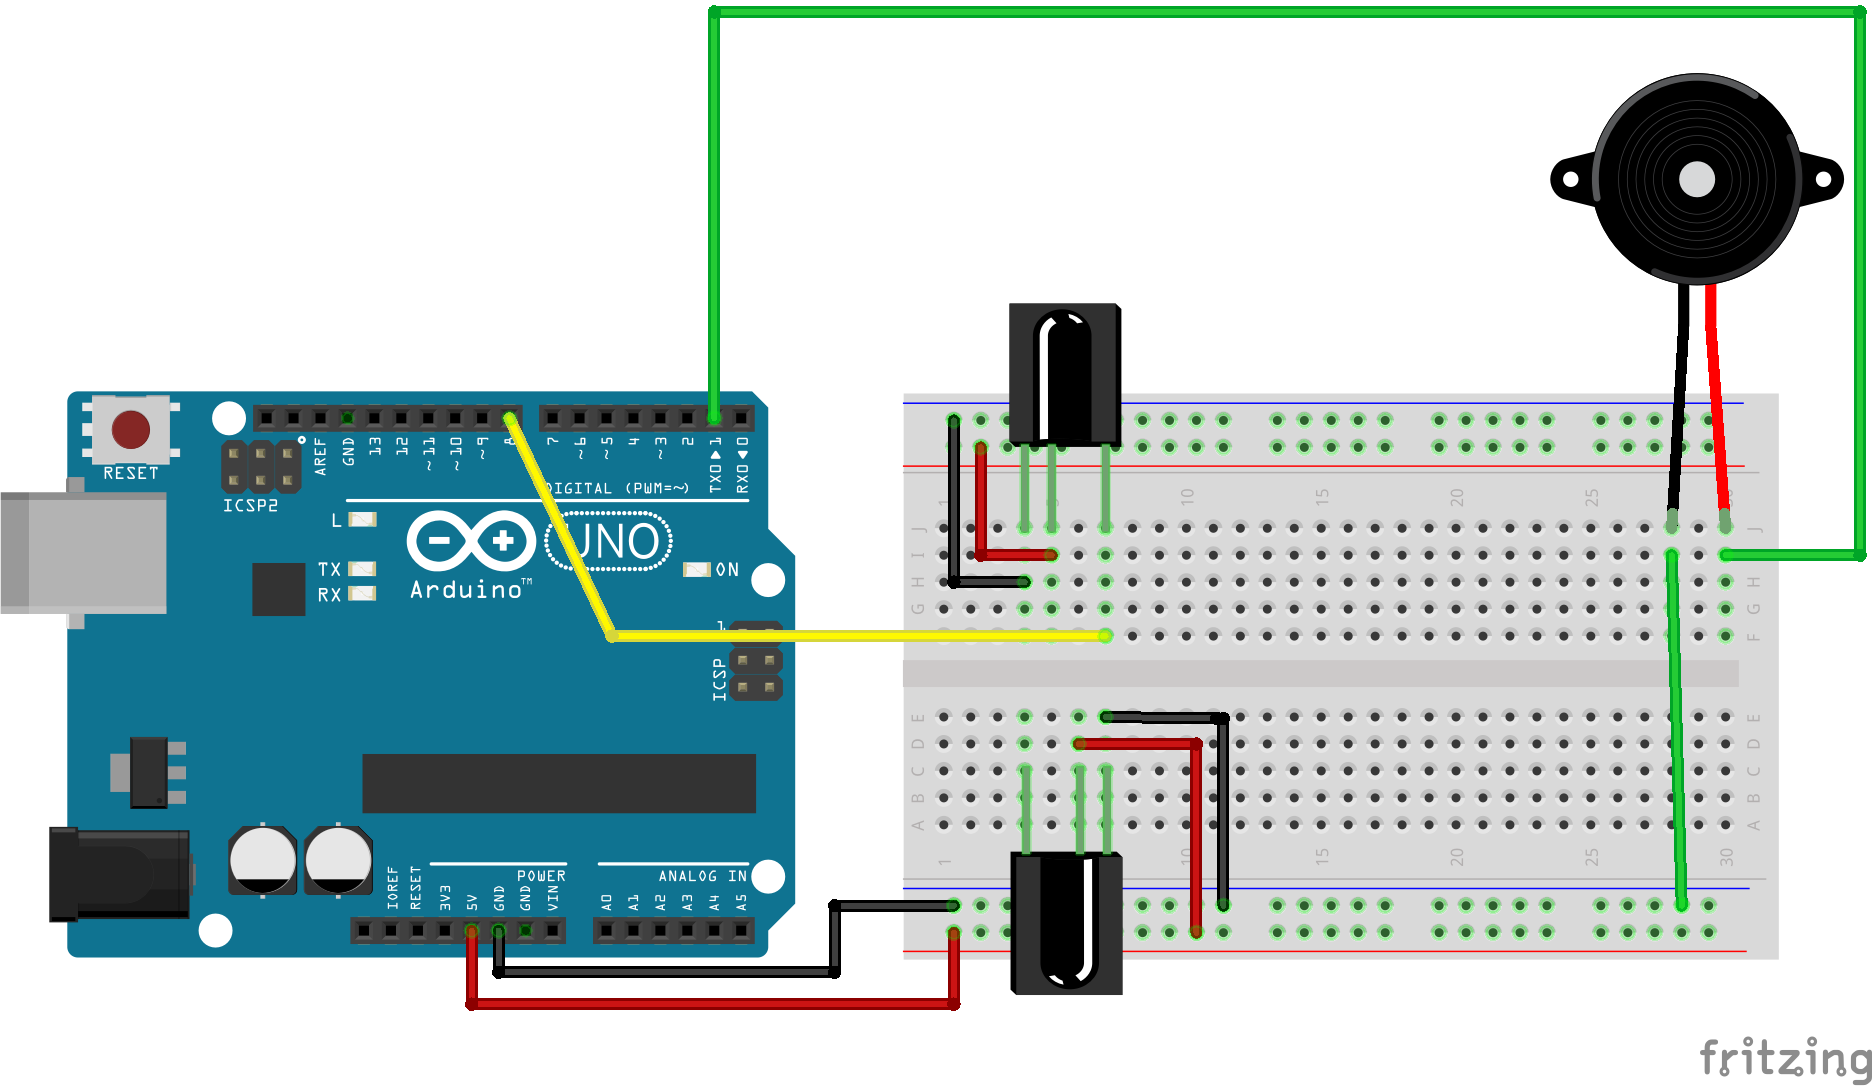 We will be using a basic piezo speaker circuit as an example load circuit. This circuit will react to the state of the infrared beam we are using. Break beams make for a great extension of our article on switches too, but we are removing the wires and physical switch. You can essentially swap the speaker part of the setup out for anything you would like, but a buzzer seems in line with the alarm system. In later tutorials, we will be making an IR remote control with your Arduino!
To follow along with us today, you will need:
Hardware Interrupts & Pullup Resistors
There're a few extra things we are going to look at when it comes to writing the sketch for our circuit. Our program will need to react to the beam braking, and play a noise when that happens.
We are going to use hardware interrupts to control that event. It might not be a perfect application of hardware interrupts, but it is a great place to introduce the concept! When using interrupts, or even just using hardware, it is good practice to put the controlling pin into a known state. That way we can accurately predict how it will react when we interface with it.
If the pin is not in a known state, we call it floating. Floating essentially means that the logic of the pin is neither on or off, and is likely oscillating between the two values. So, to put the pin into a known state, we can use a pull-up resistor to tie the pin to high logic. Pull-up resistors are present internally for the ATMega328; we are using the Uno too, and they can be accessed using the function
pinMode([PinNumber], INPUT_PULLUP);
Interrupt pins are cool at what they do. They are made just to sit idle, waiting for a pins logic to go from high to low or vice versa. When that happens, they can enter routines/functions in your code to service that event.
It works well, let’s look at the code behind the circuit.
The Code
#define PIEZOPIN 3
#define BEAMPIN 2

volatile int sensorState = 0, lastState=0;    //Variables have to be volatile or you can't use them in the

void setup() {
  pinMode(PIEZOPIN, OUTPUT);                  //Initialise Piezo for output
  pinMode([BEAMPIN], INPUT_PULLUP);
  attachInterrupt(digitalPinToInterrupt(2), buzz_ISR, FALLING);
  Serial.begin(9600);
}

void loop(){
  sensorState = digitalRead(BEAMPIN);         //read the current state of the beam
  if (sensorState == HIGH) {                  // If the beam isn't broken, tell me everything is okay.
    analogWrite(PIEZOPIN, 0);
    Serial.println("Everythings Okay");
  }
  else {
    Serial.println("Everythings Not Okay");

  }
  }

void buzz_ISR(){
  analogWrite(PIEZOPIN, 20); //Trigger Buzzer!
}
Alright, put your circuit and sketch together, and power it up. Your system should do absolutely nothing until you break them beam; when you do that you should hear the piezo getting triggered and make a buzzing sound! If you've been playing along at home, when you interrupt the beam, the microcontroller will enter the buzzISR and play the noise you've set to be played. In the future, I'll take a look at writing a sketch that can control the flip-side of this wonderful infrared coin, remote controls!

