First of all, why subject your Raspberry Pi to this level of stress? In the case of Raspberry Pi 4, the A72 CPU is so powerful that it can overheat if it doesn't have enough cooling. This results with the CPU being governed (slowed down) to reduce the electrical energy being consumed, and in turn, reducing heat generation. The RPi 3B+ and predecessors could also overheat, however, it was less of a problem for the majority of use cases. A quick stress test, in this case, will reveal if your Raspberry Pi 4 can run at full CPU-load in it's case/environment without overheating and not slowing down.
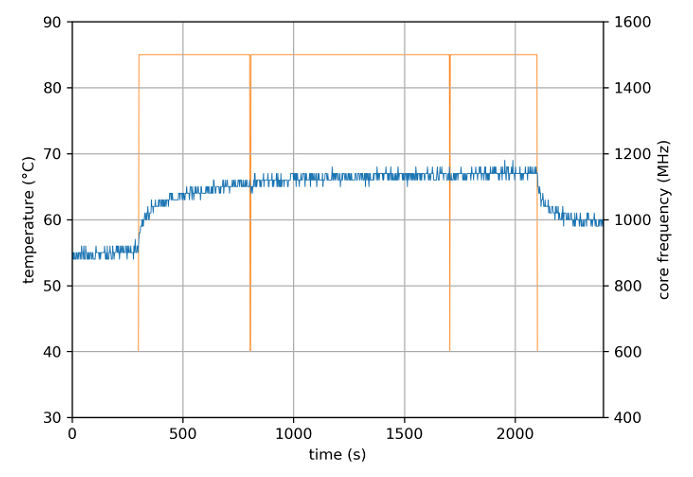
The goal of this guide is to create a chart like this, which depicts:
- A stabilization period at the beginning
- A period of time for full-load CPU
- View the CPU temperature
- View the CPU speed (to witness if the CPU is being governed, or not)
Before you get started - this guide doesn't apply to everyone. It's only for those people who are using the Raspberry Pi for heavy lifting, such as:
- Plex Server
- Retro Gaming System,
- Media Center
- A Desktop PC
- and other similar uses
 Like all makers, I searched the Internet for existing methods and stumbled upon Stressberry. The original Github repo is well maintained, however, I discovered a fork that had more features developed by Github user shortbloke. While I've been experimenting with their repo more than the original, I'll keep this guide on-point for the official package (so it ought to work for you exactly the same).
Stressberry - Setup
Open the Terminal on the Raspberry Pi and first update your RPi (this method will also update your major release version):
sudo apt update
sudo apt full-upgrade
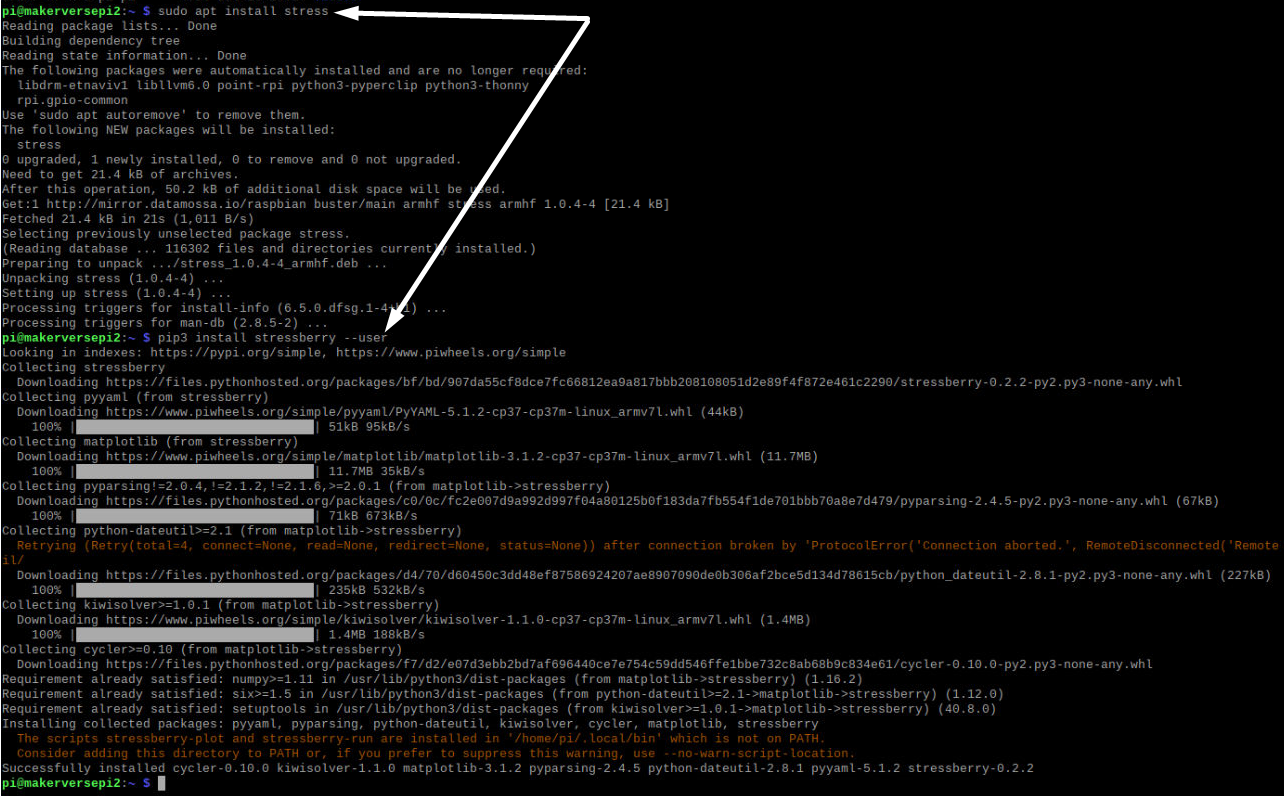
Now to install Stressberry:
sudo apt install stress
pip3 install stressberry --user
pip3 install --upgrade numpy
You ought to see these types of messages after each command:
Stressberry - Stress Testing
I recommend creating a folder in the home directory as you'll collect a few files and images as time goes by:
mkdir ~/TemperatureTests
cd ~/TemperatureTests
Use this command to begin the test (it takes about 30-minutes to complete!):
/home/pi/.local/bin/stressberry-run -n "My Test" -d 1800 -i 300 -c 4 mytest.out
Important - the generated file will be in the current working directory. That's why I've added the directory ~/TemperatureTests to ensure there are no surprises for unfamiliar people.
stressberry-run options:
- (-n "My Test") = test name, which is used later when plotting
- (-i 300) = 5-minute idle periods before and after
- (-d 1800) = 30-minute stress time
- (-c 4) = 4-cores
- (mytest.out) = the filename for the collected data
When complete, a PNG image can be generated using this command (assuming you are still in ~\TemperatureTests):
MPLBACKEND=Agg /home/pi/.local/bin/stressberry-plot mytest.out -f -d 300 -f -l 400 1600 -t 30 90 -o mytest.png --not-transparent
stressberry-plot options:
- (mytest.out) = file name of the source data
- (-f) = plot CPU frequency data
- (-l 400 1600) = frequency min/max limits
- (--not-transparent) = make image background opaque
I ran the above commands on a bare Raspberry Pi 4, and again when inside an Official Case. The room temperature at the time was about 21ºC. Charts are shown below. My observations:
- Bare board - the CPU is doing it's best to deal with the generated heat and appears to be bouncing between 600Mhz and 1.5Ghz sporadically. An interesting compromise that appears to be keeping the CPU well below the 85ºC over-temperature zone.
- Official RPi Case - after 10 minutes of full-load, the CPU was clearly in for trouble. After 20 minutes, the CPU was throttled down a whopping 30% (to 1000Mhz) and at 30 minutes it was bouncing off 750Mhz (50% performance reduction).
Chart notes:
- Blue = Temperature in degrees celcius
- Orange = CPU clock speed (1500Mhz = max)

The Official Case - Still Great Value
Extended full-load processing for 30+ minutes isn't a "usual" thing for most Raspberry Pi's. But it can happen, and for some people, it's a certainty.
The Official Case is stylish and great value for everyday computing. If you're running a distro that is going to demand endurance, then check out our passive and active cooling cases (they cost more, though are designed to have better heat management).
Possible Issues
I'm not sure why, and neither is this person, though I have had this error on one of my RPi's "ImportError: libf77blas.so.3: cannot open shared object file: No such file or directory".
If you do as well, then run this command to install the missing resources (then try to re-run your test/plot):
sudo apt-get install libatlas-base-dev
What's Next?
I plan on doing more stress tests for our favourite Raspberry Pi 4 Cases, stay tuned.

