Have you heard about the Circuit Playground? It's the new all-in-one electronics platform from Adafruit. It was created to bring all the fun features of electronics and physical computing to makers, but It's dead-simple to use, solderless and extremely affordable. Lucky for us, we've got our hands on some of these unique boards. Lucky for you, we're going to show you how to set one up and code with it! We'll be using a Windows 10 PC with the Arduino IDE and Circuit Playground Library to get going with our developer edition Circuit Playground.
The board is built on an ATmega32u4 (at 8MHz) and comes loaded with ten programmable sensors/components. To power the Circuit Playground a micro-USB cable or a 3.7V LiPo will do the trick- there's a voltage regulator on-board that takes care of the step-up to 5V. If you want to see the library that drives all the components keep reading (or take a look at the GitHub Library write-up).
In addition to the processor and powering options, the Circuit Playground comes loaded with:
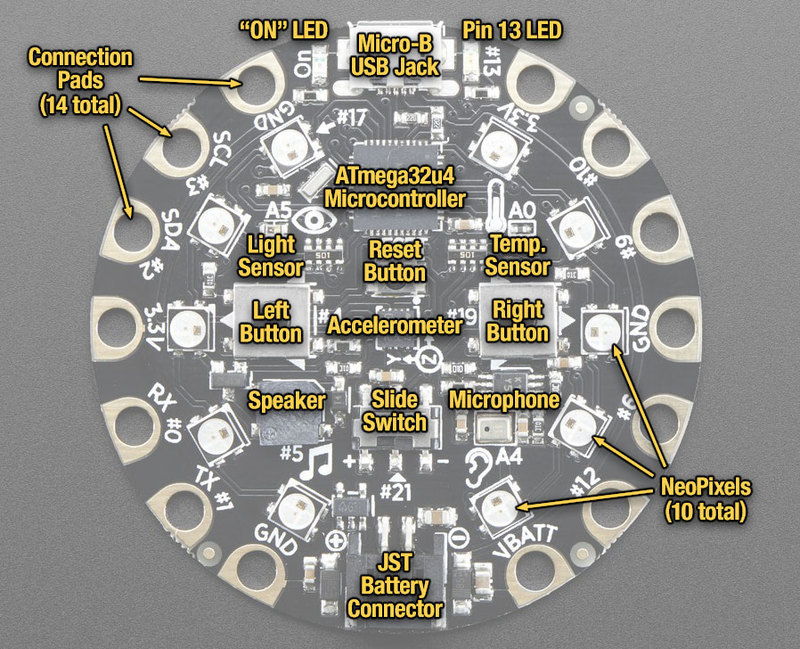
- 10 Mini NeoPixel LEDs
- 1 LIS3DH Triple-Axis Accelerometer
- 1 Thermistor for Temperature Sensing
- 1 Phototransistor for Light Sensing
- 1 MEMS microphone for Sound Sensing
- 1 Mini Speaker for playing tones
- 2 Push Buttons
- 1 Slide Switch
- Eight alligator-clip friendly IO pins - all enabled for capacitive sensing
- Reset Switch, Power LED and Pin 13 LED.
Setting up your Circuit Playground
I'll assume you have picked up a Circuit Playground already; hold your horses, though, there are a few steps before you can use it.
If you've never added a board to your IDE, installed drivers and libraries before, check out this GIF. It will quickly show you how to do so (the URL you need is: https://adafruit.github.io/arduino-board-index/package_adafruit_index.json ).
Once you've added Adafruit's Boards Manager to the IDE, use the Board Manager tool to download the AVR Boards by Adafruit Package.
The next thing you will want to do is grab the drivers for your Circuit Playground, which you can download from here.
Once you have your board installed and drivers installed, connect your board via USB and initialise it in the Tools>Boards submenu. The next step is importing the CircuitPlayground.h library into our IDE.
Importing the Circuit Playground Library
Follow these instructions to get the Circuit Playground Library into your IDE:
- Open Arduino IDE
- Go to Sketch menu
- Go to Include Library submenu
- Select Manage Libraries from this submenu
- Search for "Circuit Playground" and install the option titled "Adafruit Circuit Playground by Adafruit."
- Close this window
- Use "#include <Adafruit_CircuitPlayground.h> " to enable the library in your sketch.
Now you are well and truly ready to start interacting with your Circuit Playground. Let's take a closer look at Adafruit's Demo sketch. It is a great place to see how we can use all the onboard goodies!
Load up your demo sketch from the File > Examples > Adafruit Circuit Playground submenu. We are going to break down the different functions available to us in our new library and the syntax behind them.
The Circuit Playground Library
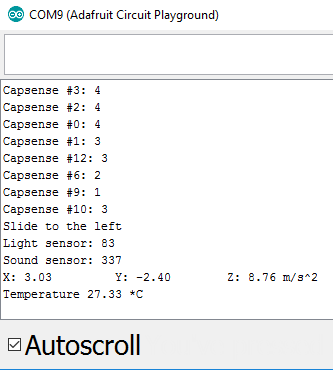
An example of the Serial Data output from each sensor
on the Circuit Playground Demo Sketch.
The two first things we see from the Circuit Playground Library are the include library function at the top and the begin function within the Void Setup. Let's look at interacting with the onboard components.
This function controls the Red Led connected to Pin 13 and can be set high or low.
CircuitPlayground.redLED(HIGH);
This function will read a capacitive value from the touch-pad indicated within in the brackets. Returns a value between 0-65536.
CircuitPlayground.readCap(3);
This function will return a true/false state of the switch.
CircuitPlayground.slideSwitch();
This function will play a specified tone for a specified period.
CircuitPlayground.playTone(frequency, time, wait=true);
This function will address a certain LED (p=0-9) and write a colour to the LED (c=24-bit colour value)
CircuitPlayground.setPixelColor(p, c);
This function will turn off all the NeoPixels on your circuit playground
CircuitPlayground.clearPixels()
Both of these functions will return a true/false value for the button's state.
CircuitPlayground.leftButton()
CircuitPlayground.rightButton()
Both of these functions will return a value in the range 0-65536 depending on current light/sound levels of the board.
CircuitPlayground.lightSensor())
CircuitPlayground.soundSensor())
These functions all call upon the accelerometer to return the value of acceleration in each axis of the module.
CircuitPlayground.motionX()
CircuitPlayground.motionY()
CircuitPlayground.motionZ()
This function will return a value of the current temperature of the module in degrees Celcius.
CircuitPlayground.temperature()
Did you notice how easily it was to interface with this board? That was Adafruit's point in creating Circuit Playground! Now you know what the buzz is surrounding Circuit Playground. We walked through the steps required to get up and running with one of these remarkable little boards; from getting it out of the packaging to making the sensors and LEDs talk to the IDE. The setup was straightforward, and now you can use any of the sensors onboard to control your project. Don't let us (or your wallet) hold you back either - pick up a Circuit Playground board for under $30.00 right now! Once you've followed our guide and created something fun, share it with us in the Forum. We would love to see some of the possibilities that Circuit Playground opens up to you!

